I’d like to share a few useful tips and tricks for working with PowerPoint that I’ve come across over the years, starting off in this article with a few tips on how to work with automatic timings, and to break from those timings when things go off track.
I’ve tested all of these procedures with PowerPoint 2010 while writing – your mileage may vary with other versions.
Timing Things Just Right
Imagine you’ve been given 5 minutes to give a presentation with 20 slides (yes, this really happens – check out Ignite Dublin for some excellent examples).
Left to manually change slides you might panic and move too fast, or get too engrossed in your story and have to stop before you’re halfway through. You could keep an eye on the clock, distracting you from what you’re saying; or ask an audience member to prompt you at intervals, distracting them.
A more elegant solution is to apply automatic timings to your slides. In the case of Ignite, I believe each slide gets equal time, so the solution is simple (15 seconds per slide), but in another forum, you might want to give twice as long to one slide as another, or run 5 slides in rapid succession, spending the rest of the time focusing on the remainder.
PowerPoint allows you to rehearse delivering your presentation and time how long you spend on each slide. It can then replicate the flow for you when you’re delivering for real. It’ll also let you know your overall presentation time, so if you need to bump it out a bit or reign it in, you can decide which slide timings to tweak. And you can edit the per-slide timings manually – you don’t need to rehearse and record a second time unless you really want to.
To rehearse and record your timings:
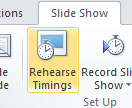
 Go to the Slide Show ribbon and click Rehearse Timings. PowerPoint will start the presentation from slide 1.
- Go through your presentation at your intended pace, hitting the space bar every time you want to progress to the next slide.
When you’re done PowerPoint will tell you the total time taken for the presentation, and ask if you want to record your slide timings. - Click Yes to save the recorded timings, or No to discard them.
To edit slide timings:
 Select the slide whose timings you want to edit.
- Go to the Transitions ribbon, and find the Advance Slide section.
- Edit the value in the After box (minutes:seconds) to how long you want this slide to stay on screen.
Note: In the Advance Slide section, you can uncheck the box beside After if you want to stay on the current slide for an indefinite amount of time, for example where audience participation is required and you don’t know how long will be required. In this case, the presentation will move forward automatically on the other slides, but wait for you to manually move on from this one.
If you want to turn off automatic transitions for all slides, go to the Slide Show ribbon and de-select the Use Timings check box.
Taking a Break
Sometimes you’ll want to depart from your presentation due to a pertinent question, an impromptu debate, or an interesting tangent. If the content in the current slide is relevant to your break, you can pause your presentation by right-clicking and selecting Pause.
If it’s not, you can quickly blank the screen by either tapping B on your keyboard to show a Black screen, or W to show a White screen. Clicking B, W or the space bar will return you to your presentation, and timings will resume from where they left off. For example, if you clicked B 5 seconds into a 15 second slide, it will stay up for a further 10 seconds when you resume.
Jumping Ahead
If you want to skip ahead in your presentation, you can simply click your mouse, hit the space bar, or use the forward or down arrow keys. All do the same thing and move you forward one slide at a time.
If you jump ahead, any timing set for the slide you move to remains the same – if it was due to stay up for 5 minutes originally, it will stay up for 5 minutes from the time you open it, even if you get there 10 minutes early.
Jumping Back
To move backwards in a presentation, one slide at a time, use the back or up arrow keys.
When you jump back to a particular slide, PowerPoint will stick with that slide till you’re ready to move on, regardless of any timing settings. Once you move forward again to any subsequent slide, the recorded timings from that point on apply as usual.


