Accessing Geographically-Restricted Web Sites

So – hot on the heels of yesterday’s post on TV-less TV, here’s something I coincidentally discovered yesterday, courtesy of a post by Graham Linehan on an episode of the Daily Show that couldn’t be shown on UK TV.

Modify Headers is a free Firefox add-on that allows you to edit the HTTP request headers you send to web servers while browsing. Ostensibly, it’s intended for testing web sites to see how they respond to specific requests, but it is possible to use it to access some geographically-restricted content, such as on-demand TV programming.

Note: This worked on some sites I tried, but not on others, so results aren’t guaranteed. Maybe I was picking bad IP addresses, or maybe the sites in question have a way of checking if this add-on is in use.

To use the Modify Headers add-on:

  1. Install Firefox if you don’t already have it.
  2. Download and install the Modify Headers add-on.
  3. Restart Firefox.
  4. In Firefox, select Tools | Modify Headers.
  5. In the dialog box that appears:
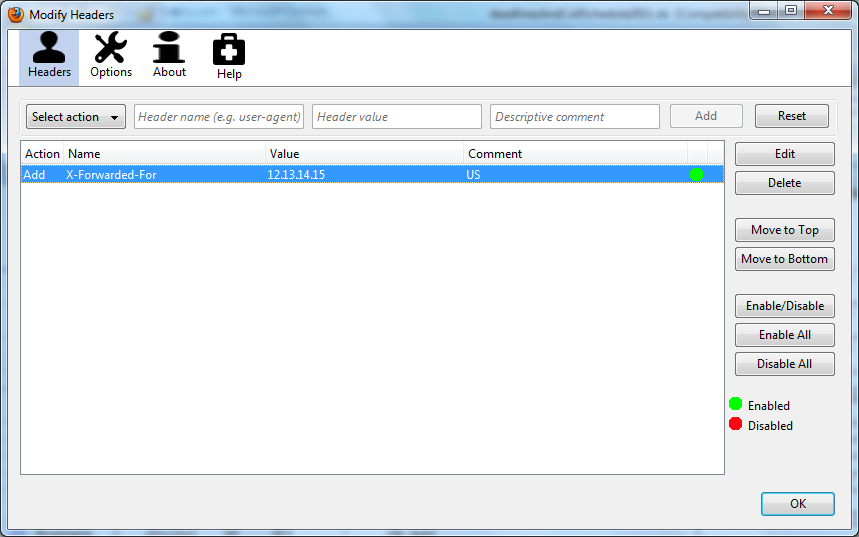
    1. From the Select Action drop-down, select Add.
    2. In the Header Name field, enter X-Forwarded-For.
    3. In the Header Value field, enter an IP address appropriate to the country you want to pretend you’re from (12.13.14.15 worked as a US address for me).
    4. Click Add.
      Your header is added to the list area.

    Modify Headers Dialog Box

  6. Repeat step 5 as many times as necessary to set up headers for each country you want to pretend you’re in.
  7. Before browsing to restricted content, turn the appropriate header on and the others off.
    Enabled headers have a green dot at the end of the row in the list area; disabled ones have a red dot.
    To change a header’s status, double-click that header’s row.
  8. Leave the Modify Headers dialog box open! Your modified headers are only sent while the dialog box is open.
  9. Browse to the geographically-restricted content you want to view, and away you go (hopefully!).

TV Without a TV

BBC’s Global iPlayer app for iPad launched today – hooray! It’s a free app, but requires an in-app subscription to access anything beyond demo content. Subs are €6.99 per month, or €49.99 for the year. A nice touch is that you can download episodes to watch later when you’re offline – handy for commuters, holiday makers and the like. The selection is good, but could be, and hopefully will be, improved. Most noticeable gap for me is the dearth of good children’s programming – virtually the only channels we watch on traditional-format telly these days are Cbeebies and CBBC, and it would be great to be able to stick a few of their programs on the iPad for the kids to watch when we’re on the move. BBC iPlayer can be accessed through a web browser on a regular computer here – TV programs aren’t accessible outside the UK, but many excellent radio programs are.

Note: I tried accessing the BBC iPlayer Radio site through Safari on the iPad and iPhone, but on the iPad got an error that I had to switch from 3G to WiFi for it to work (3G wasn’t turned on), and on the iPhone got an error that I was outside the UK, although that’s not a problem when I access from my laptop, so I guess the site doesn’t play well with iThing browsers.

While I was enjoying the BBC iPlayer app, I decided to install the 4oD Catch Up app too. Although the blurb says it doesn’t work outside the UK, I’m watching an episode of Spaced (comedy gold) through it as I type and it’s working fine. You can watch 4oD in a regular web browser here.

ITV don’t have an iThing app yet, but have a web-based player here. (Doesn’t work from Safari on iThings.) Content is only available in the UK, though.

And last, but not least, RTÉ also lack an app, but have a web-based player here. (Again, doesn’t work from Safari on iThings.) A limited selection of their programming is accessible internationally. Aside from News programming, I’ve barely looked at RTÉ live since they launched their Player. It must be getting popular, as they’ve started including ads in many (/all?) of the programs now, which was a rarity when they launched.

So there we go – welcome to the future – TV on demand, without a TV – hooray!

Retuning a FreeSat Box

If you’ve gone down the FreeSat route, you may find from time to time that channels stop working. There are a couple of possibilities for why this happens:

  1. The channel has stopped transmitting.
  2. The channel has changed how it’s transmitting.

In the case of option 1, a bit of an auld google for the channel name should find you an official page somewhere, which may indicate whether they’ve gone from FTA (free-to-air) to paid, or a dead site may indicate that they’ve gone out of business.

In the case of option 2, instructing your decoder box to rescan should pick the channels up again. However, while a simple re-scan will usually work, under certain circumstances you’ll need to fiddle with the settings a bit first. Again, googling should point you to what’s changed so that you know which settings to modify.

Simple Re-Scan

If a channel has adjusted its frequency just a teeny bit, the existing program slot may magically start showing the channel again after a straightforward rescan; if they’ve made a big leap, the channel will most likely wind up tacked on to the end of your existing program list, and you’ll have to either start using the new channel number, or rejig your listings to move the new channel to where the old channel was, depending on how you use your decoder box.

Disclaimer: Every box I’ve ever used has just added new channels to the end of the existing program list when I re-scan. Just in case you have the one box that wipes the existing list and starts over, either decide you’re happy to do any channel re-ordering necessary before trying the steps below, or go find the manual that came with your box and see what it says before doing anything.

How to perform a simple rescan (generic instructions – check your box’s manual for specifics):

  1. Go into your box’s settings/menu.
  2. Find an Installation option and select it.
  3. Within Installation, select TP Scan/TP Setup or similar. (TP is short for transponder.)
  4. Select the Search option.
  5. Sit back and watch the progress bar till the re-scan is complete, then go check out your new channel list and see if you’ve got your channel back, either in its original location, or in the new channels at the end of the list.

More Complicated Re-Scan

If the channel has done something more interesting to change how it’s transmitting, you might have to play with some of the scan settings to get it back.

For example, BBC recently changed how it transmits its HD channels, changing from a DVB-S to DVB-S2 modulation. This meant that if you had already tuned these channels, you got a blank screen when you selected them, because the signal was no longer transmitted in the expected way. A simple re-scan uses a default set of parameters to find channels – if the channel you’re after uses non-standard parameters, it won’t show up. In our case, the default setting for our Ferguson Ariva Combo box was to search for DVB-S, but not DVB-S2, so the new BBC HD signals weren’t picked up. We had to explicitly instruct the scan option to use an alternative modulation.

Using our Ferguson Ariva box, this is what we had to do:

  1. Delete the existing channel entries for BBC HD and BBC One HD. (A simple re-scan with these still in situ didn’t work.)
  2. Select Menu | Installation | Satellite TP Setup.
  3. Select the following options:
    Satellite: Astra 2 EB1
    Transponder no: 10/87
    Frequency: 10847
    Symbol Rate: 23000
    Polarity: Vertical
    Transmission: DVB-S2
    FEC: Auto
    Modulation: QPSK
    Pilot: Off
  4. Select Search, and watch the HD channels magically reappear.

If you’ve recently lost your BBC HD channels and a simple re-scan doesn’t work for you, you should have similar options with whichever decoder box you’re using, so edit to the options above and try again.

If another channel goes AWOL from your listings, google to see if the channel still exists, and whether the broadcaster has issued a press release to say they’ve done anything interesting to how they transmit, then either do a simple re-scan, or a re-scan with modified settings as appropriate to get it back.

No Such Thing as a Free Meal – Free TV on the Other Hand…

When we moved to our current home a few years ago, we decided that rather than endure the hassle and expense of a subscription-based service for our TV needs, we’d look into setting up a system to receive TV for free. (Aside from the TV license which we loyally cough up for every year!)

We started off with a Free-to-Air kit from Lidl for the UK channels and rabbit ears for the Irish, but over the years we’ve fine tuned and tweaked our system to suit our needs.

An annual subscription to one of the main TV packages in Ireland will cost you €276 for a one-TV setup. You can set up your own “free” system using the components described below for a similar cost, plus a weekend of DIY and geeking that will either make or break your relationship with the people you live with, but once it’s in place there’s no ongoing fee.

Equipment

  • Satellite dish – These are available all over the place. They show up regularly in Aldi and Lidl (usually including a satellite decoder box), or can be purchased in most big hardware stores, like B&Q. If you’re already signed up to one of the big satellite companies, chances are your contract says that once you’re out of your minimum term you get to keep your dish. For the typical channels of interest to an Irish audience, you’ll want to point at the Astra 2 satellite at 28.2° East. If you fancy an alternative selection of channels, check the lists on lyngsat.com to see which satellite broadcasts the ones you’re after.
    Cost: Free -~€80.
  • LNB – The LNB is the little box that sits at the end of the satellite dish’s arm reading the signal collected by the dish. You’ll usually get one of these with your dish, but double check in case you need to buy one separately. Because the LNB is an active element of the circuit, you’ll need a connection on it for each TV you want to connect to the dish: don’t try using splitters on your cables, it won’t work. Each decoder box in your house needs its own LNB connection, and the box sends an instruction to the LNB saying which channel it wants separated out from the hundreds picked up by the dish.
    Cost: A bit over a tenner for a single LNB, up to ~€40 for a quad/octo LNB.
  • Terrestrial antenna – The Saorview Irish channels aren’t currently broadcast via satellite, so you’ll need a terrestrial antenna to pick these up. Look for DVB-T written on the box. Depending on how close you are to a transmitter (see map), you could get away with anything from a booster with rabbit ears beside your TV, to a big spikey antenna in your attic or on your roof.
    Cost: €20 to crazy money.
  • Coax cable and F connectors – You’ll need coax to hook your satellite dish and/or terrestrial antenna to your decoder box(es), with F connectors at each end. How much cable you need is highly dependent on where your dish/antenna is located and how many decoder boxes you’re using. Dish kits often include a reasonable length for free.
    Cost: 100m spools of coax go for ~€30-60. Connectors are less than a euro each.
  • Decoder box – You can go for separate boxes for the satellite signal and the terrestrial signal, or a fancier box that will do both. We went with the latter – cuts down on hardware, and power and TV connections. Our box is a Ferguson Ariva HD Combo, which in addition to decoding both satellite and terrestrial signals also has a USB connector so you can hook up an external hard drive and use PVR functions (pause/rewind live TV, and record programs to hard disk).
    Cost: ~€180-200 for the new edition of the Ferguson Ariva box.
  • TV – I’m not factoring this into the overall kit cost, but make sure you have something to watch programs on once everything else is in place (a TV, projector or computer), check what connectors you have (Scart/AV/HDMI/…) and make sure they’re compatible with the decoder box you want to use. Dave picked our TV so it has silly numbers of connectors of every flavour, just in case – once a sys admin, always a sys admin.

If you’re looking for places to start locating all these bits and pieces, places we’ve used for ourselves and friends/family we’ve helped get their own set ups going are: Aldi and Lidl (seasonal availability), freesat.ie in Fairview (helpful, friendly guys), B&Q, Maplins and Peats. And ask around for spare parts – anyone who’s started out with a kit system may well have dishes, cable or decoder boxes lying around gathering dust – we’ve rehomed a fair amount of kit as we went through the fine-tuning process.

Finally, once you’re all set up, if you’re in search of a nice, customisable TV listing tool to go with your custom installation, check out the TV Guide app/web site.

TV Guide App

This is a review of one of my absolute favourite iThing apps – the tvguide.co.uk TV Guide. It’s free, it’s customizable, it has bells and whistles aplenty, and it has saved me a fortune in weekend newspapers that I only bought for the TV listings. There’s a website too, for those without iThings, which looks fine in IE and Chrome, but is a bit messed up in Firefox.

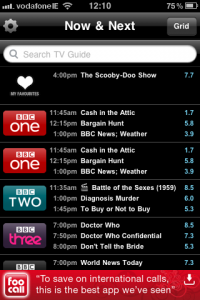
TV Guide app on iPhoneThere are different versions for iPhone and iPad and both make the most of the screen space available.

The iPhone version shows the times and titles for the current and next 2 programs on each channel. Click a channel to get full program summaries.

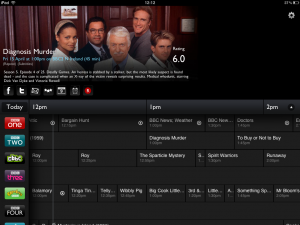
The iPad version has a more magazine-y feel to it with scrollable listings at the bottom of the screen, and a picture and program summary at the top of the screen for whichever program you’ve selected in the listings.

TV Guide app on iPad

Both versions allow you to customize your channel list to show only the channels you have (or only the ones you’re interested in), and they include Irish channels plus regional and HD variations for the UK channels. Since we’re on a free-to-air setup and don’t get a number of the standard UPC/Sky/Whoever channels, this is great for us – no skipping through reams of irrelevant info.

Once you’ve selected which channels you want listings for, you can then order them to suit – I’ve put our favourite channels at the top so they appear on app launch.

If you are a Sky subscriber, you can set up login credentials, which I believe will allow you to remotely set up recording.

Some of the bells and whistles:

  • When you select a program in the future, you can ask for an alert to remind you before it starts (how many minutes before the program starts the alert pops up is customizable in the settings), or if you have a Sky account set up, you can set it to be recorded.
  • You can add programs to your iThing calendar, post about a program to Facebook/Twitter/LinkedIn, or email info about a program to someone.
  • You can check when else the same program is on again – brilliant if you’ve missed the start of a show or have just discovered a new series you want to OD on for a bit.
  • You can also rate programs (the app shows an average viewer rating for each listing), and add them to your favourites (in which case listings for those particular programs appear at the top of the main listings page ahead of all else).
  • You can search the current day’s listings, or listings for the coming 7 days, for any program title – great for when things get rescheduled due to sports and the like, or you’ve missed if the 2-parter you’re watching is over 2 nights or 2 weeks.

In short – it’s wonderful, it’s free, go get it!