Custom Ribbons in Word

I find it occassionally useful to drag some buried functionality in Word right up to the surface and add it to a ribbon so that it’s a click away instead of half a dozen clicks, 3 dialogs and 2 tabs away. And thanks to custom ribbons, I can!

To create a custom ribbon (checked against Word 2010 and Word 2013):

  1. Click File | Options, to open the Word Options dialog.
  2. Click Customize Ribbon in the left-hand panel of the dialog.
  3. Customize Ribbon Dialog
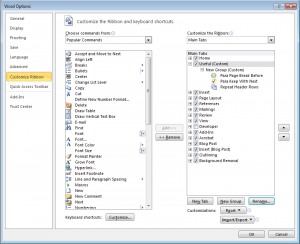
Click New Tab below the tab list on the right-hand side of the dialog.
    A new tab named New Tab (Custom) is added to the tab list, with a default group, New Group (Custom), nested below it.
  4. To rename the new tab and the new group, select the tab/group entry, click Rename… below the tab list, enter a meaningful Display name on the Rename dialog and click OK.
    Note: Word adds one group to a new tab by default, but you can add more by clicking New Group below the tab list. A divider appears between each group on the ribbon, and the group name appears below the ribbon buttons.
    Next, the fun bit: adding commands!
  5. In the right-hand panel, select the custom group to which you want to add one or more commands.
  6. Scroll through the list of commands in the left-hand panel, and for each one you want to add, select the command then click Add>>.
    You can filter the list of commands using the Choose commands from drop-down list at the top of the left-hand list. I like to use the All Commands filter to make sure I don’t miss anything! 🙂
  7. Once you’ve got all the commands you want added, the final tweak is to arrange the tab, group and command positions to your liking by selecting each one and either dragging it up/down the list or clicking the Move Up/Move Down arrows.
  8. Click OK to save your new ribbon.

Customized RibbonHey presto, your wonderful new ribbon is available at the top of Word every time you open it.

Notes: You can also customise Word’s default ribbons, and if you work on multiple machines and would like to use your customizations elsewhere, the Import/Export button on the Customize Ribbon screen of the Word Options dialog allows you to do just that.

Blog Monitoring Changes to Google’s Algorithm

This blog (catchily titled “Google Algorithm Change History”) is an interesting resource for anyone interested in SEO, or just wondering why their (or their stalk-ee’s) website is doing better or worse this week compared to last.

Covering major algorithm changes only, descriptions are short and to-the-point, and where applicable they include links to an additional article or two with more info in case you’re particularly interested.

The list of changes recorded looks pretty comprehensive and goes back as far as 2000.

No Signs Please!

When I was little, you’d occassionally see posters saying “Post No Bills” on hoardings around town – in my innocence I thought it was a form of protest against charging people for things. I spotted the poster below on a doorway in Arklow. The “plain English”-ing of the old-style version somehow makes it funnier.

"No Signs Please" Sign

Printing from iThings at Home

I have long been driven mad by wanting to print an article, or an email, or whatever from my iPhone or iPad at home, but our trusty printers (that I have no interest in replacing) aren’t AirPlay-enabled. Instead, I’ve resorted to emailing myself details of the thing that needs printing, then cranking up the ol’ Windows laptop, waiting, waiting, waiting some more, logging in, waiting some more for networks to be associated with, waiting some more… you get the idea… and eventually, printing the thing.

Yesterday evening, I decided “No more!”, and embarrassingly enough, in under 10 minutes with an expenditure of around €15, we were set up with a delightful working solution and no messing about with mystic configuration settings.

Printopia from ecamm downloads in minutes, installs in seconds, is configured in seconds, and worked first time. We downloaded the free 7 day trial first, managed to print random pages/emails/whatever from a few different devices, so immediately took the plunge and invested in the full version.

Printopia shares out the printers configured for the Mac it’s installed on to be detected as AirPlay print options by iThings on the same network. You can also configure apps such as iPhoto or Evernote, or services like Dropbox as “print” options to print/archive content there.

It’s Mac only, and if the Mac it’s installed on has fallen asleep, you’ll need to prod it awake before you can print. Our Mac wakes in seconds from hibernate, with a tap on the keyboard, or opening the Remote app, or pinging it, compared with the seemingly-infinite ramp-up time for my Windows laptop.

I’m thrilled with the solution and think it’s worth every penny – would heartily recommend it to anyone with non-AirPlay printers and a Mac that’s always or almost always on their network.