Don’t Let the Pigeon Run This App

Icon for Don't Let the Pigeon Run This AppAnother favourite first-a-book-now-an-app with the small people in this house is Don’t Let the Pigeon Run This App! The pigeon is a mischievous little guy who wants to do things a pigeon ought not to and will do his best to cajole, blackmail and bribe the reader into letting him do what he likes. I first heard the book “Don’t Let the Pigeon Ride the Bus” recommended on an American parenting podcast. I got a copy and the boys loved it, so when I discovered there was an app, I was more than happy to give it a go.

The app allows children to: create a story of their own (by filling in specific gaps in the standard story), save favourite stories to “read” again later, and learn to draw the pigeon.

App Home PageDesigned with multiple ages in mind, there are 3 ways to create a story:

  • The Egg way is to shake the heck out of the pigeon (by shaking the iThing) when prompted, which results in random selections at key points in the story.
  • The Chick way is to begin with a quiz where you pick from a list of options for each of the items to be filled in (you choose at the start, without context, and the options vary each time you run the app).
  • The Big Pigeon way is to answer questions into the iThing’s mic (“name your favourite food”, “what’s your favourite game?”), so the possibilities are endless.

You can save your favourite stories generated the Big Pigeon way to read/listen back to over and over.

Boys being boys, my two get a greater kick from saying silly (sometimes rude) things that make no sense and hearing their voices repeat these things back in the middle of the story, than trying to create something that’s genuinely amusing from a narrative point of view. But, ultimately, if that keeps them amused for any length of time, then I think the app is doing its job.

The part the boys spend least time on, but that entertains me a bit, is the “Draw the Pigeon” lesson, where you’re given shapes to trace around at each stage, and your final result is presented to you. There’s no policing of how close you are to the guide lines, so you can augment your pigeon as you like at any stage to amuse yourself. Again, if you like the results of your efforts, you can save the picture to admire again at your leisure.

Overall, because it’s a bit different every time, but the expectation that it’ll be fun is established early, and it’s as easily used and enjoyed by a not-terribly-verbal 2 year old as an overly-verbal 5 year old, this app is a winner for us.

Style Overrides in FrameMaker

One of the reasons I prefer FrameMaker over Word, is that it doesn’t automagically update your paragraph styles as you work. Word has a tendency to either add new items to the list when you make a tweak (Normal, Normal but Bold, Normal but Italic, Normal but 12pt and blue…), or to modify an existing style to match your one-off customization, and all of a sudden a paragraph two chapters back is mysteriously rendering in 14pt instead of 10 and when you fix it that extra-large warning note you were working on earlier has gone back to 10pt “all by itself”. There are settings buried in the software to determine what exactly happens when you modify a style, and where the change propagates to, but Word works in mysterious ways, and I just don’t have the time or energy to figure it all out.

I favour the simple elegance of how FrameMaker does things:

  • FrameMaker Status Bar showing Paragraph and Character StylesThe paragraph and character styles for the selected text are shown in FrameMaker’s status bar.
  • FrameMaker Status Bar showing Modified Paragraph StyleIf there’s a manual override to a paragraph style (for example, a change of font), an asterisk appears beside the style name in FrameMaker’s status bar.

If there is a manual override, you can check what the original definition is in the Paragraph Designer, and decide whether the override is justified or not.

If an override is justified:

  • For a genuine one-off situation, you might want to just leave the override in place. Bear in mind, that if you reimport styles and say to remove overrides, you’ll lose the modification at that point.
  • For a recurring situation, you might want to create a new style. For example, if you want the first paragraph of every section to be blue and italic to designate it as introductory material, that’s worth a new style. (Click Commands | New Format in the Paragraph Designer.)
  • If you decide the override is one you’d like to see everywhere this paragraph style is used, then you’ll want to update the existing style to match the modified version. (Click Update All in the Paragraph Designer.)
  • And finally, if you decide the override is invalid, you should just re-apply the correct style instead and move on. (Click Reset in the Paragraph Designer.)

Simple and elegant. Me likey.

Book Review: Fitness for Geeks by Bruce W Perry; O’Reilly Media

Fitness For Geeks Book CoverMy latest choice of book as part of the O’Reilly Blogger Review Program was Fitness for Geeks by Bruce W Perry.

I was hoping for something light, fun and filled with recommendations of gadgets and apps that might entertain and motivate me to exercise. This book is not that. It is absolutely not a light or an easy read – it’s a serious, detailed, in-depth treatment.

If you’re into facts and figures, and evidence-based analysis and opinion on dietary fads, exercise, metabolism and the like, it’s yer only man. I’m too much of a light-weight, I’m afraid.

There are gadget and app reviews, but they’re almost secondary to the main focus of the text. The author does make recommendations of best uses of the tools available, and points to a number of excellent websites from which you can get more in depth information on the topics he covers.

Perry looks in some detail at exactly what diet and exercise do to the human body, what works and what doesn’t. There’s lots of science and technicality. There are also lifestyle tips, interviews and case studies. It’s a thorough treatment, but a bit too thorough for me: in places I found myself glazing over as things got more technical and detailed than I could digest.

I’d recommend this as a great reference text to have at hand to dip in and out of when you have specific queries and want detailed information rather than a one-liner: for example, why do we need certain vitamins, and what happens if you exceed the RDA – and for that matter, what is an RDA, and how does someone decide what it should be? But it’s not a fast-paced, cover-to-cover motivational read, so if that’s what you’re after, look elsewhere.

You can find out more about the book and order it direct from O’Reilly here.

I See Dead Websites

I’m still on my genealogy buzz this week, and may have finally discovered a birth cert for an elusive ancestor, which makes me very happy. However, when I went poking around my bookmarks from a couple of years’ back for other sites that would help me fill in some gaps, I discovered that one of my favourites (that harboured lovingly transcribed lists of births, marriages and burials from my hometown) was no more – disaster! U

But then I reminded myself that there were a couple of ways that the good ol’ internet would allow me to see the ghosts of dead websites, so the hunt was back on.

First off, there’s looking at cached pages in search results on Google. (Other search engines may do this also, but since I usually default to Google, that’s what I’m going to describe.)

Google Search Results with Cached OptionIn this case, enter search terms for your web page as usual, and when you find a result for the dead page you’re after: 1 – click the little chevrons to the right of the result to preview the page (in the case illustrated, the preview shows a “Temporarily Unavailable” message), then, 2 – click the link labelled Cached just above the preview to see what was there the last time Google looked.

Unfortunately, if the cached page you get has links to other pages on the same website, they will be proper links to the live site, and if the site is down, they will fail too, so you’ll either have to somehow get each page to show up in Google’s search results, or move on to my next web-timetravel resource: the Wayback Machine on archive.org!

Wayback Machine Search FieldEnter the URL for the site/page you’re after in the search field, then click Take Me Back.

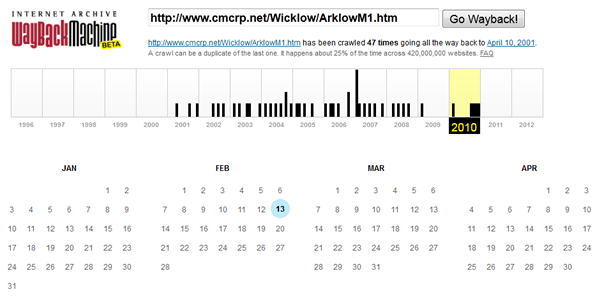
Search Results for the Wayback MachineThe search results show a timeline of when snapshots were taken of the page/site, and a calendar of specific dates. Navigate to the one you want, click and away you go. All internal links on the pages will work as though you were visiting that website on your chosen date.

Thanks to this wondrous website, I can once again access the precious data that I hope will let me finally figure out who some of my ancestors are.

Researching your Irish Family Tree – Part 1

My mum in law is very into genealogy, and managed to get me hooked on it when I was on maternity leave a couple of years ago. Well, for the couple of months before baby arrived, at least: once he was here, all time for such things went out the window. But I’m finally finding a few spare moments now to get back into it.

There’s more and more information becoming available online all the time, so you can do a lot from the comfort of your home. I’ve managed to fill in the direct line back as far as quite a few of my great-great-great grandparents on both sides now, with most of the info coming from online, and I’m starting to fill in brothers and sisters.

So, while I’m in the zone, I thought I’d share a few of the resources I’ve been using, and maybe you’ll get the bug too.

First off, some free sites that will get you started:

  • The National Archives Censuses of 1901 and 1911. These are a good place to start, as chances are you’ll be able to ask living relatives for enough information to find definite matches. In both censuses ,on the A form you’ll get the registered people’s full names, relationship to head of household, religion, literacy level, age, profession, marital status, birthplace, use of the Irish language, and whether they have one of a specified list of disabilities. The 1911 census includes a wee bit more information: how many years of marriage are completed, total number of children born alive, and number of children still living. If you’re happy you’ve got a match, you can take a look at the B forms too, and find out more about the house and extended property your ancestors lived in/on.
  • If you’re lucky enough to have ancestors in Carlow (CoI only), Cork & Ross (RC only), Dublin or Kerry, Irish Genealogy have digitised church records for these areas, so you may be able to track down births, deaths and marriages for some of the people you’ve found in the censuses. If you say you want to see births for a certain name, you’ll be shown all birth records that include that name, either as the child, a parent or a sponsor. There was a tendency back in the day (in my family at least!) to have a bundle of children about two years apart, so once you’ve found a birth and parent names for one ancestor, you can search for one or both of the parents on birth records in or around the same timeframe to get a set of siblings. Relatives often stood as sponsors, so recurring names here can tip you off to further family connections.
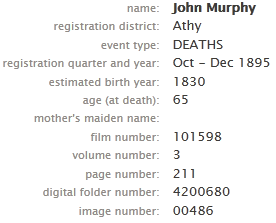
  • FamilySearch.org result showing GRO referencesFamilySearch.org is a service provided by The Church of Jesus Christ of Latter-day Saints, aka the Mormons. It’s very thorough, and you stand a very good chance of finding something useful on here. The type of information returned depends on the resource. There’ll always be some kind of textual summary, and there may be a link or reference to where you can find more information (free or paid). For Irish births, deaths and marriages, keep an eye out for returns that show an event type, name, registration district, quarter and year, volume number and page number (as illustrated above for a random John Murphy – no relation). Jot these down, make your way to the General Register Office (GRO) in the Irish Life Mall between Talbot St and Abbey St in Dublin, and for the princely sum of €4, you can get a copy of the original registration entry for the event, which will contain more information to help you identify whether or not this is the person you’re looking for, and hopefully point you in the direction of more people to follow up. If you’re trying to do things on the cheap and are looking for marriage records, do this search for both husband and wife – if you get a match on district, year, quarter, volume and page, chances are you’ve found the pair.

OK – now I’ve started you down the spending money path, so let’s break and reconvene another time to look at a few more resources.