Mine’s a Whisky (Thing)

My usual mid morning tipple is a good hot chocolate. I’ve been indulging for so long that I’ve spoiled myself by perfecting the preparation of same at home, and I thought I’d share my method.

First, though, a quick note: Probably the most critical piece of equipment in the following procedure is a Whisky Thing™ (also known as a milk frother): this is a hand held gadget with a teeny frail whisk at one end and a weightier motor, on/off switch and battery pack at the other. They’re produced at the swanky end of the market by people like Bodum and Aerolatte for €10-€15, or at the less swanky end of the market by people like Ikea for ~€2. The swankier ones tend to come in hard presentation cases, and it’s worth storing them in same to protect the whisky bit from inevitable accidental bendage. I’ve owned about 4 of them at this stage (thanks to bendage) and am pretty unfussy about brand, but unshakeable on how essential it is to have one.

Preparation of the perfect hot chocolate.

Equipment:

  • One drinking vessel – a mug with a bulging body and narrow opening retains heat best.
  • One microwave.
  • One Whisky Thing™.
  • Milk – I like regular cow’s milk, or hemp milk for a non-dairy alternative.
  • Good hot chocolate powder – Nothing I’ve tried thus far can beat Cafe Direct’s San Cristobal.

Diagram:

Hot Choc Equipment

Method:

  1. Add ~200ml of milk to your drinking vessel (which should have a total capacity >200ml).
  2. Place vessel in microwave and nuke for 2 minutes @850W. Adjust time to suit your own machine’s rating.
  3. Remove heated vessel of milk from microwave, add 3 generous teaspoons of hot chocolate powder, and whisk till completely mixed/dissolved using the Whisky Thing™.
  4. (Optional) Hold the Whisky Thing™ just below the surface of the milk towards the end to produce a pleasant cafe-like froth, which both insulates the top of the beverage and looks pretty.
  5. Find a quiet spot, kick back, and enjoy the results.
http://www.cafedirect.co.uk/our_products/ourrange/product.cfm?productid=17

Re-creating a Book in FrameMaker

I’m a massive advocate of FrameMaker. It’s a great documentation tool, and unlike a certain other product, it doesn’t try to read your mind and make all kinds of weird and wonderful unrequested changes under the hood without checking with you first. Or that’s mostly the case, at any rate.

I have had problems with one instance of FM storing meta data without letting me know it was doing so, or giving me an easy way to remove it: when you update a book file, FM catalogs and hangs on to some meta data about its contents that you might rather it forgot at some point and there’s no obvious way to make that happen. The data type I’m aware of (there may be others I’ve not encountered) is condition tags.

Here’s the story: I worked on a doc set that was maintained by multiple authors. One particular chapter of information was repeated in 3 guides, and 3 versions of the content were being maintained separately, so we decided to merge the chapters and reference a single file from all 3 book files. Huzzah for efficiency!

When we started the merge, though, we discovered that the 3 chapters used different condition tags that all did the same thing. This hadn’t been an issue before as each book was maintained in isolation, so once conditions were the same across all files in the book, that was fine. Once you started using content from one book in another, though, things started to get messy.

In anticipation of merging/reusing further content, we decided to spend some time standardising the condition settings across the full doc set. We agreed a common naming and formatting scheme for the conditions and updated all content files to use the new conditions. Job done.

Well – no. When it came to updating the books, the Show/Hide Conditions dialog now showed all the old condition names plus all the new condition names, and there was a bit of confusion over why they were all still appearing. Had we missed a reassignment/deletion somewhere? We couldn’t find it on Body pages, so started trawling Reference pages and Master pages to no avail. If we were going to be stuck with all the conditions being listed, how would we remember which ones were current so that our Show/Hide conditions were guaranteed to be correct?

After a bit of googling and experimenting, I discovered that FM book files retain meta data about the conditions used by the files within the book, and the only reliable way to get rid of the data was to re-generate the book. Great.

I tried:

  1. Create new book.
  2. Drag files from old book.
  3. Save new book.
  4. Check Show/Hide settings (unwanted conditions gone – yippee!)
  5. Regenerate book.

Uh oh – the generated TOC from the original book was now static in the new book.

OK – so I’d just recreate the TOC and all would be fine. But TOC setup information, titles, headers and footers, custom page layouts and the like were lost, and making sure everything was set up correctly again would mean spending more time than I fancied verifying every detail against the style guide and templates.

I was starting to wish we’d never started making things easier.

Surely there was a sneaky way I could just convince the new book file to use the old generated file again?

So, to cut a longer than necessary story short, after some trial and error, I came up with the following:

  1. Back up your project just in case – this should be your first step in any significant book-level operation.
  2. Click File | New | Book to create a new blank book.
  3. Open the old book and drag all files (static and generated) from the old book to the new book.
  4. Close the old book without saving (just in case).
  5. Save the new book. You can replace the old book if you like.
  6. At the book level, click Add | Table of Contents.
  7. Click Add on the Set up Table of Contents dialog – don’t worry about selecting paragraph tags to include yet.
  8. Click Update on the Update Book dialog.
  9. Close the generated TOC file without saving.
  10. Copy the name of the old TOC (now a static file in the new book), delete the static file from the book (but not the disk), and rename the generated TOC file to the old TOC file.
    If you don’t remove the static file from the book before renaming the new one, FM won’t let you reuse the file name.
  11. Right-click the TOC file and click Set up Table of Contents.
    The Set up Table of Contents dialog shows all paragraph tags in the guide on the right hand side. There’s a <paragraph tag>TOC paragraph tag for all paragraph types that were included in the original TOC, so scan through the list and add the non-TOC version of each of these tags.
  12. Click Set on the Set up Table of Contents dialog.
  13. Update the book.

Ta dah! New book, superfluous meta data gone, lovingly fine-tuned TOC file preserved, in a fraction of the time it might’ve taken.

Web Apps – the New Knitting

I have a habit of picking up hobbies, getting obsessed with them for a while, then moving on to the next thing. A couple of years ago it was knitting, right now it’s web apps.

The Seed of an Idea

Gardening, though, is one of the hobbies that’s stuck, and I’m still at it many years on. I don’t grow vast quantities of anything, but I like to have a go at most things just to see how they go, and home grown definitely tastes best.

I garden in containers, mainly. Ever since I For the last few years, I’ve spent the first week or two of each vegetable growing season trying to figure out what I should plant in which pots to reuse the compost the “right” way, and wishing that there was a nice friendly little app I could refer to that would tell me: “oh, your old carrot trough? you should stick some tomatoes or potatoes in there this year” and the like.

Well – at the moment I’m in a “when hobbies collide” zone, and decided that while I’m on a web app buzz, I’d go ahead and write the damned app since noone else seemed to be doing it.

How it Works

The app gives you two options: tell it what you grew last year and it’ll recommend what you can grow in the same spot this year, or tell it what you want to grow and it’ll recommend where you should plant based on last year’s planting.

The current version works on a common 5 year rotation. My research indicates that there’s more than one, so it may not match what you’re already doing. If you’re nosy, you can take a look at the page’s code and figure out what the original 4 year rotation was before I updated to a 5 year one, and see how they differ.

Have a go of the app!

Note: If you want to skip a vegetable category, you can select one of the recommended crops and plug it back into the app to skip forward or back a stage. For example, if I want to grow broccoli and the app recommends I plant it where I had legumes last, but I haven’t planted any legumes, I can select “beans” as the crop I’d like to plant instead and see what would have been planted in the same spot 2 stages ago, then stick my broccoli there instead.

Credit where Credit is Due

To allow iThing users to download the web app, store it on their device and use it natively, I used Google’s Mobile Bookmark Bubble. Considerably less hassle than going through the iTunes submission process.

To refresh my poor tired mind on things HTML and javascript, www.w3schools.com was of great value.

The Joy of SodaStream

In the last few years a reincarnated SodaStream made an appearance on the Irish market. What a blast from the past! Back in the day, mine was one of the families lucky enough to own one of these fancy devices, but thrilling though the process of fizzing the water was, we weren’t mad about the resulting drinks.

At that time, the drinking of fizzy water would have been something of an oddity, so the main aim of owning a SodaStream was to recreate commercial fizzy drinks at home for a fraction of the cost. But the range of real fizzy drinks we were familiar with was somewhat limited: Fanta, Coke and Pepsi, TK Lemonade, Club Orange and 7Up would have been about it.  As a result, SodaStream’s offerings tasted funny to our limited childhood palattes and the novelty wore off quickly.

Nowadays, we’re used to a much wider range of weird and wonderful flavours in our fizzy drinks, from the big name producers, to the sometimes weird and wonderful imports in the smaller ethnic shops around town, and homemade fizzy drinks using an ever increasing range of cordials and juices. Fizzy water is a proper drink in its own right too now.

Chez Murphy-Malone, we’ve been largely making our own fizzy drinks at home for the last few years using cordials, juices, and bottled fizzy water bought in bulk from the supermarkets. We’d treat ourselves to pre-prepared fizzy drinks every now and then for a bit of novelty/variety, but mainly stuck to the mix-it-yourself solution. The bottled water, though, took up a sizable amount of valuable space in our kitchen and didn’t hold much aesthetic value.

But what bothered me more than the storage issue was the amount of plastic waste we were generating. It’s become less noticable in the last couple of years now the fortnightly green waste collection includes plastics, but it used to be a bigger deal when we had to transport one or more sacks of empty (and crushed) 2L water bottles to the bring centre every month.

SodaStream comissioned a report on the impact of soft drinks on the enviroment which can be found here. It doesn’t actually go into the details of the impact of producing a SodaStream machine, but provided you’re in it for the long haul, I reckon it must balance out relatively quickly.

Cost-wise, if you’re buying cheap fizzy water and paying ~50c a litre, 180L will cost €90. To buy a SodaStream and refill the cylinder twice at Argos prices is €91. For the extra euro, you’ll save yourself schlepping around and recycling 45 plastic 2L bottles.

Note: At the time of writing, Argos are selling the white SodaStream for 1/3 off at a mere €43.32, if you feel like breaking even a bit quicker.

When SodaStream relaunched here a few years back, the only place I could find them was in the Argos catalog, which sold starter kits, but not refills, so once you’d fizzed your first 60L, you were done. I briefly looked into the logistics of exchanging cylinders by post, and contemplated bringing them back as hold luggage from holiday destinations, but it was all a bit messy and awkward so I just wrote it off as a nice but impractical idea. In the latest Argos catalog, though, they included a listing for refills/canister exchanges, so my interest was revived. On checking the store locator on their website, I discovered that there are actually a few stores in Ireland now stocking SodaStreams and doing canister exchanges, so having paid a visit to a couple to make sure their listings weren’t outdated/fictional, I decided to look into swapping pre-fizzed water for the DIY kind.

I picked up a lead test for our water for a tenner on eBay, just to make sure we weren’t going to poison ourselves. That was negative, so when we finished our last bottle of fizzy water I took the plunge and swapped the large chunk of floorspace we’d been using to store bottles of fizzy water for the small patch of countertop space which now homes our shiny white, fizzy water and fart noise making toy.

In principle, a canister provides 60L of fizzy water (fizzed 1L at a time these days instead of 250ml). I’ve not been monitoring the actual volumes we’re getting, but we’re still going strong on the original canister 6 weeks later and no sign of it giving up. When it does expire, there’ll be considerably less hassle involved in transporting the expired canister and shiny new refill than the number of large bottles of sparkling water it would’ve taken to keep us busy in the meantime!

Of course, the real eco-friendly solution would be to stop drinking fizzy water already, and I’m sure I’ll get there eventually, but for now, I’m enjoying my SodaStream and the reduced environmental impact of my fizzy drinks habit.

Tracking App Performance

As mentioned before, last Summer I was involved in designing and creating Points Calculator – Ireland – a fabulous iThing app that everyone who ever has or ever plans to sit the Leaving should download forthwith, regardless of whether or not they have an iThing to play with it on. 😉

This post is about ways I monitor the ongoing performance of the app, and may be of interest to anyone thinking of launching an app themselves.

Apps for Apps

The first way I monitor our app is by using the following two apps:

ITC Mobile
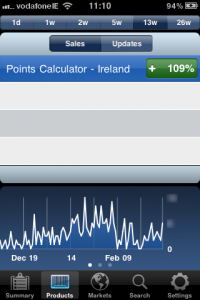
ITC Mobile ScreenshotThis app is provided by Apple, and allows registered app developers to check their sales figures for different timeframes covering the preceding 26 weeks (for the preceding day only, or for the preceding 1, 2, 5, 13 or 26 weeks).

Figures are updated once a day (around 1pm Irish time), and you can choose to see your stats broken down in a variety of ways:

  • Sales of all Paid Apps
  • Sales of all Free Apps
  • Stats for in App purchases
  • Stats for updates rather than new downloads
  • Stats by product (new sales or updates)
  • Stats by market (new sales or updates)

Tapping the number of sales/updates in each view cycles though:

  • the absolute number of sales/updates for the period
  • the trend for the period, as a positive or negative number
  • the trend for the period as a positive or negative percentage

A graph at the bottom of each screen gives a more visual representation of the same information, and turning your iThing to landscape orientation presents just the graph in a full screen view.

It’s a nice little app, and since the numbers come straight from Apple you can have faith in the accuracy of what it tells you. We saw an expected peak of downloads between LC results and the week of CAO offers, then an unexpected jump around Christmas and New Year, presumably indicating that a fair number of LC students got iThings for the first time as presents or in the sales.

PositionApp
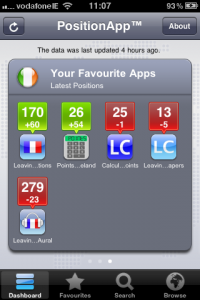
Position App Screenshot
This is a paid app, but I’ve had hours of entertainment from it so found it worth the small cost. It highlights the movers and shakers in the iTunes App Stores, giving current ranking and relative movement in the charts.

Default views are of the Top 100 and Top 300 apps in all genres, and there’s a customisable page for your own list of favourite apps, which can be any apps at all from the iTunes iPhone App Store (at the time of writing they don’t monitor stats for the iPad App Store), so it’s a nifty way to keep track of your competition or random apps you’re interested in.

I track our app and other similar and dissimilar apps in the Irish Education market. In the past week, I see that several education apps I’m monitoring have suddenly reappeared on the radar after an absence of several months, from which I’m inferring that students are suddenly downloading relevant education apps in a bit of a pre-mocks panic.

Other Ways to Monitor your App

Aside from the apps above, I also have Google Alerts set up to let me know whenever our app gets a mention, and I check periodically in the iTunes App Store.

Google Alerts
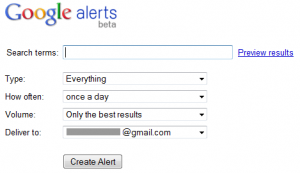
Google Alerts Setup
Google Alerts allows you to configure searches that Google will perform automatically. New results that match your criteria can be mailed to you, or added to a feed in Google Reader. You can restrict the types of results Google returns for your keywords, for example by saying you only want to see news stories or blog posts featuring your terms. You can also specify that you want to get results immediately as new matches appear, or at daily/weekly intervals.

As with the PositionApp, I use alerts to monitor mentions of our app, our competitors’ apps, and LC points calculators generally.

Timing is Everything

As far as I can tell from the alerts I’ve been receiving, they seem to be sent at the same time of day that you create them, so bear this in mind when you’re configuring an alert and set it up at the time of day you’ll get most benefit from receiving the updates.

App Store(s)

It’s worth having a look at the iTunes App Store from time to time too to see how your app is doing.

When you go into the apps section, you can choose to view iPhone or iPad apps, and each has different listings and a different chart, so if your app is available on both platforms, check both charts. Our app ranked higher for longer in the iPad chart than in the iPhone chart, most likely due to the lower number of apps in our category rather than absolute numbers of downloads.

iTunes Flag IconYou can also view charts for different countries by scrolling right to the end of the iTunes Store screen, clicking the little circular flag icon and selecting the flag for another country from the next screen that appears.