Checking Readability in Word

My 5 year old’s school is running a program to help the small folks with learning to read and write. As part of this, the small folks’ parents get weekly meetings with a support teacher to discuss tasks and learning objectives, and the techniques that will help us and the kids to achieve them. It’s relatively painless, very interesting, and I can see a huge improvement in my small person’s reading skills after just 2 weeks, so all good.

At yesterday’s meeting, the issue of reading ages for different texts came up, which reminded me of a hidden tool in Word that can check the readability of your text.
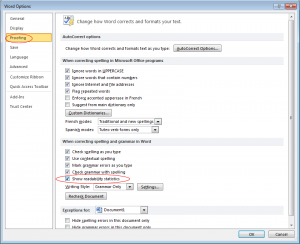
The Word Options Dialog BoxTo turn on readability checking in Word 2010:

  1. Click File | Options.
    The Word Options dialog appears.
  2. Click Proofing.
  3. Under When correcting spelling and grammar in Word, select Check grammar with spelling.
  4. Select Show readability statistics.
  5. Click OK.

(If you’re using another version of Word, search for “readability” in the Online Help to get instructions on how to turn this feature on.)

Once readability stats are enabled, just run a spelling and grammar check on your documents as usual, and when that’s finished, Word pops up a dialog showing lots of lovely stats on your text.
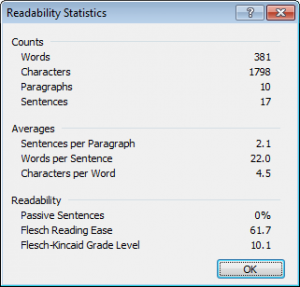
Readability Statistics ResultsI’ve illustrated with the results of an analysis on my last blog post (Online Baby-Related Resources) .

For the Flesch Reading Ease, the  higher the score, the easier your text is to understand. At the top of the scale, 90-100 should be understood by an 11 year old. A score of 0-30 means that your readers will most likely need a university degree to understand what you’ve written. My article scored 61.7, meaning it should be easily understood by 15-17 year olds. Given the subject matter, that seems like an acceptable lower boundary.

The Flesch-Kincaid Grade Level equates the Flesch Reading Ease score to an American school grade (10.1 for my piece).

If you’re aiming for a particular reading age, you can go back and tweak your writing as appropriate to achieve an appropriate Readability score. The Counts and Averages stats will give you an idea what to focus on. To get a lower score and increase your audience scope, use simpler vocabulary, and rewrite for shorter sentence length. Keep editing and rechecking till you’ve reached the reading level of your target audience.

For more information on how the Flesch Reading Ease and Flesch-Kincaid Grade Level scores are calculated, and what the results mean, check out this Wikipedia page.

Disappearing Text in PDFs – Part 2

Following on from a post I wrote a while back on text that was present in the source file, but mysteriously vanished on saving to PDF, here’s a similar incident I encountered with a different resolution.

In this case, again authoring in FrameMake, I was working on a number of reference manuals in the range of 500-800 pages long a piece. All was going well until it came time to publish one of the longer books as a PDF. On checking the generated file to make sure all looked well, I skimmed through quickly. First few pages, fine… next few pages, fine… next few pages, … hang on – what’s that big gap there about?… next few pages, now all the tables are blank!… skip quickly to the end… all that’s left is the header/footer rulings!

Starting over and saving the PDF again gave the same results – in fact, it looked like problems might just be happening earlier and earlier in the document each time.

First port of call was a few “turn it off and back on again”s. First the software, then the whole machine. After a reboot, the same problem kept recurring.

Next stop, fiddling with Acrobat settings, with an occasional reboot for good measure. Still no joy.

A bit of a Google, trying out a few random suggestions, and finally I hit on the solution that worked: delete the font cache (C:\Windows\System32\FNTCACHE.DAT (that’s .DAT – not .dll! Don’t mess with your .dlls or you’ll go blind!)), reboot, save the pdf immediately.

The font cache is regenerated when you reboot, so if the same problem arises again, lather, rinse and repeat.

In the case of the document I was working on, I had to delete the font cache and reboot between every save of the document or text started disappearing again. Depending on the length and complexity of the document you’re working on, your mileage may vary.

Disappearing text in PDFs – Part 1

There’s little more frustrating than finishing writing a lengthy document, with minutes to go to a deadline, clicking Save as PDF with a heavy sigh of relief that everything’s finally done, then opening the final PDF for a last once-over before drawing a line under the project, only to discover that – GAH! – a bunch of text is missing! But it was there the last 20 times you generated draft PDFs! What’s happened?

I’ve had text disappear from PDFs mysteriously twice in the last year, both with different causes and solutions, and I had a heck of a time trying to find a solution both times. This post is on the most recent, and more obscure, problem.

I was working on a FrameMaker document that contained a series of tables of data. All had gone swimmingly through several iterations of the draft document, but when I generated the final PDF for publication, the text from the first cell had disappeared in 80% of the tables. Odd.

I saved again with the same result. Still missing. I rebooted my machine and tried again, still missing. Updated my software, still missing. I checked the help but couldn’t find a description of my problem. Not even google could help me out. This was getting annoying.

I went back to the dud PDF and discovered that if I tried to select the missing text in the affected cells, I could copy and paste it from the PDF to a text file, so it was actually there, just invisible.

So, probably a font issue? I modified the text properties to use a different font, different size, different colour. Nada. I edited the PDF settings in Acrobat Distiller to embed all fonts all the time, never substitute fonts, increase the resolution, decrease the resolution… You name it, I tried it, but the cell contents remained obstinately invisible.

Back in the source files, I tried recreating tables and changing font settings, but nothing worked.

Finally, I gave up my investigations, grabbed a cuppa and vented at a colleague. He described a similar problem he’d had when working in PowerPoint. In that instance,  a background had rendered in front of the content on saving to PDF, so to fix the problem he selected the background and sent it to back in the source file. Food for thought.

I decided to check out the table properties in FrameMaker, and there it was: row backgrounds were set to white. But the page was already white, so I could safely remove that. I set the background to None instead for the affected tables, saved as PDF one more time, and my invisible content reappeared. Huzzah!

Still no idea why the problem affected first content cells only, or only a random subset of the tables in the document, but if I ever encounter disappearing content in table cells again, I’ll be checking out my cell background properties first.

A completely different cause of and solution to text disappearing when FrameMaker files were saved as PDFs is covered here.

Book Review: Documents, Presentations, and Workbooks by Stephanie Krieger; O’Reilly Media

Documents, Presentations and Workbooks Book CoverI recently joined the O’Reilly Blogger Review Program, and the first book I downloaded to review was this one: Documents, Presentations, and Workbooks: Using Microsoft Office to Create Content That Gets Noticed by Stephanie Krieger. For the most part, I really enjoyed it – it’s a huge book with a vast amount of useful information, and it’s made me more interested in working with Office than I have been in most of the past decade.
One particularly nice feature of the book is that it’s written to cover both Microsoft Office 2010 on Windows and 2011 on Mac, each of which does things slightly differently. Each version also has some special platform-specific features you won’t get in the other one, so it’s useful to know when you can achieve something interesting by switching platforms (if you have that option). I think this may be the first book on Office I’ve read that’s dual platform – I hope it won’t be the last.

Another thing that appealed to me, as a Tech Writer, was that the author included plenty of pointers on documentation best practices, rather than making it all about the tools and features. I hate when tool advocates recommend doing something really fancy, just because you can, rather than because it adds anything to the doc.

A top tip from the author is her recommendation that if something is too hard to achieve in the software, maybe you shouldn’t be doing it. She advises to investigate whether there’s a more straightforward way to achieve the same thing, and to undo and start over when things get too complicated. “Always use the simplest option for any task.” Wise advice. Especially if you’re producing a document that will be maintained in the long term. She also goes into explaining how the software actually manages a document managing formats, objects and stories. Knowing all this is a great advantage when deciding how to structure a document and understand how and why Word does what it does to the content later.

She also has advice on identifying the most appropriate tool for the job, depending on what content you want to present (including when PowerPoint might be the best choice for producing a book, rather than Word), how to transfer/re-use data between programs (and from 3rd party programs) effectively, how to reinforce style and brand, and how to present information in the way that will maximize its value to the intended audience. It’s not all “the tool lets you do X, so you should do X”, it’s more “the tool lets you do X, but you’d be mad to do that instead of Y, which is more straightforward and logical.”

There are plenty of practical tips on using the tools too. Here are just a few of my favourites, ranging from trivial to less trivial:

  • Customizing existing ribbons, or better yet creating your own custom ones.
  • Knowing that the undo cache is preserved for each Excel/PowerPoint 2010 document you’re working on when you save, so you can resume undo-ing next time you open. This is a really nice feature, and I wish every product included it.
  • Using SkyDrive (or SharePoint) and Office Web Apps for remote access and to share projects with multiple authors/editors. (If multiple authors work in parallel, the area each author is currently working on is blocked for other authors.) Potentially useful, though I found SkyDrive a bit flaky when trying it out. I’ll certainly use it again, though, for non-critical stuff.
    Usefully, the author lists what features will and won’t work when editing different file types using Web Apps, which could save on a lot of head scratching and frustration.
  • Using Broadcast Slide Show to deliver a presentation over the web.
  • Using Backstage view to check what hidden/personal information you’re sending out in your docs.
  • Applying and customizing themes to reinforce branding across documents.
  • Using Picture Tools to manipulate images in situ instead of editing them in a graphics package first. There are a lot of nice effects and tools available.
  • Recovering earlier versions of a document, or even – get this – documents you closed without saving! I love this!

There were only two things about this book that I didn’t like, and the first is half-praise, half-criticism:

  • I found out about so many Office features I’d not used before, and that I just had to try out right away, that it took me forever to get through the book. In fact, at the time of writing this review, I have to admit I’m still not done.
  • For the most part, I read the book on a Kindle, which wasn’t an ideal format. It was frustrating to read a book on good presentation which wasn’t ideally presented itself. I’ve found this to be a generic problem with technical texts, though. Graphics were indistinct, tables ran outside the screen area, and notes took up sufficient screen space that they distracted from the flow of the main text. It was also difficult to dip in to the text and pick out interesting items to look at in isolation.
    The PDF is much prettier, and in traditional print I’m reckon it would’ve been a quicker, easier read.

All in all, it’s a good read, and worth a look. While it wouldn’t persuade me to discard FrameMaker as my tool of choice for technical documentation, I would feel happier and more confident using Office products for smaller projects and presentations now.

You can find out more about the book and order it direct from O’Reilly here.

Dealing with Rogue Fonts in FrameMaker

This is a FrameMaker gotcha that occurs frequently. You’ve used a font somewhere in a .fm file, moved the file to another machine, and got an error saying the font’s not available and will be substituted by something else. Sometimes this is a nuisance, sometimes it’s a really big deal.

Temporary Substitution and Permanent Substitution

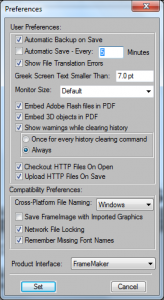
FrameMaker 9 General Preferences Dialog BoxFirst things first. Check whether any substitution FrameMaker makes will be permanent or temporary before you do anything with the file. Depending on your settings, once you hit Save, the substitution could be made permanent, and if you don’t have another template to import from, or if the font usage is a manual style override, then you’ve lost the correct style information forever. What’s more, you get no say in which font FrameMaker uses instead, so you might just be creating a new, different problem if you allow a permanent auto-substitution.

To check how FrameMaker is handling missing fonts, select File | Preferences | General…, and in the dialog that appears see whether the check box beside Remember Missing Font Names is selected or not.

If it’s selected, FrameMaker will substitute another font while you’re editing on the current machine, but if you move to a machine with the original font installed, it’ll start using that one again. If the check box isn’t selected, then FrameMaker substitutes another font for the one that’s missing, and when you save, the substitution becomes permanent.

If you want to change the Remember Missing Font Names behaviour, close any open files first (without saving), then:

  • If you are 100% sure that the font should never appear here under any circumstances, de-select the box. Open your file, FrameMaker will substitute a font you do have; save your file, and the rogue font is gone forever, but you’re stuck with whichever substitution FrameMaker went for.
  • If you want all the original font information for the file to be remembered, select the check box, and work away, secure in the knowledge that things will look as they should again when you move to a machine with the correct fonts.
  • If you don’t particularly care eitherways, select the check box anyway – if it’s a shared document someone else might care.

Where’s the Font?

If you want to track down where a missing font is used, FrameMaker’s Find/Change function will help you do so.

  1. Open the Find/Change dialog box/tab/panel/whatever you’re having yourself.
  2. Select Character Format from the Find drop-down list.
  3. Select the font you were warned about in the Family drop-down list at the top of the ensuing dialog box.
    To make things easy, unavailable fonts appear greyed out in the Family drop-down list, so you can identify them at a glance. Hooray.
  4. Next, repeat steps 1-3 on Body pages, Master pages and Reference pages separately. Find/change operations only apply to the page type you’re currently on. Le sigh.

If you find the font, you can make a call on whether the usage is valid or not. If it’s not, get rid of it; if it is, keep it. Simples.

Sometimes, though, you won’t find the font on Body, Master or Reference pages. In this case, it’s truly rogue, and the best way to proceed, provided it’s either the only font that you’ve been warned about or you’ve had the same result for all missing fonts reported, is to de-select the Remember Missing Font Names check box and save the file. FrameMaker will eradicate it from the file forever and you can live happily ever after.

Back in Kansas

If you preserved original font information while you edited, then you should either install the missing font on your current machine, or move to a machine with the font installed before you publish.

If you didn’t preserve original font information, you should re-import your paragraph and character formats from a copy of your template before publishing. (And make sure you’re on a machine with the required fonts.)

Aside – Missing Fonts Hinder Global Find/Change

If you’re performing a global find/change across a book, and some files in the book use missing fonts, FrameMaker refuses to open them to search through. The simple work around here is to open all files in the book before starting your search.