Search Tips #4: Google Timelines

This is a nifty Google feature I discovered accidentally a couple of weeks ago, thanks to Dr Who, and the River Song character in particular.

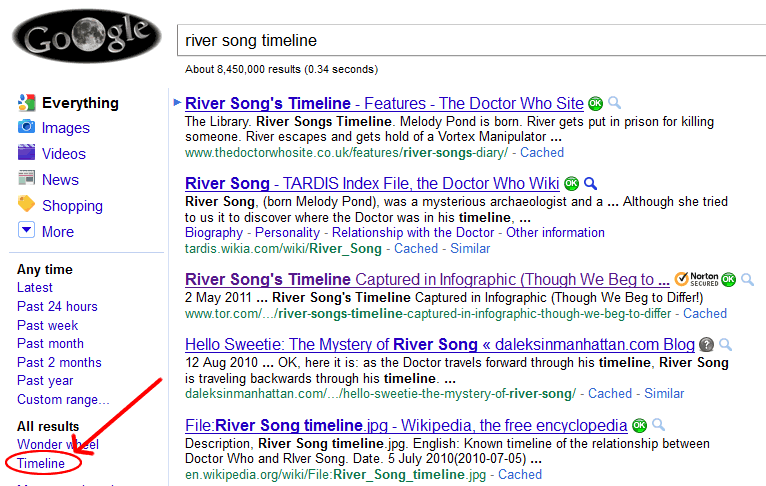
I’m not a massive Dr Who fan, but the boys are, so I tag along for the ride if there’s nothing more interesting to do when an episode is on. I’ve seen an above average number of episodes this season, for some reason, so was regularly exposed to River Song wittering on about when the Dr would find out who she really was. Putting on my “I could write this” hat, I had a bit of a ponder, came up with a theory, then was a bit chuffed when it turned out to be right in the last episode. Once I’d finished doing my victory dance, I sat down with Google to see whether other folks had also guessed right, and to check whether I’d inadvertently picked up on any big hints in earlier episodes without realising it. Because of the whole time travel thing, searching to see if anyone had documented River Song’s timeline seemed like a good place to start – which is when I noticed this option in the Google search results:

Timeline option in Google Search Results

Hmmm… never noticed that before – interesting.
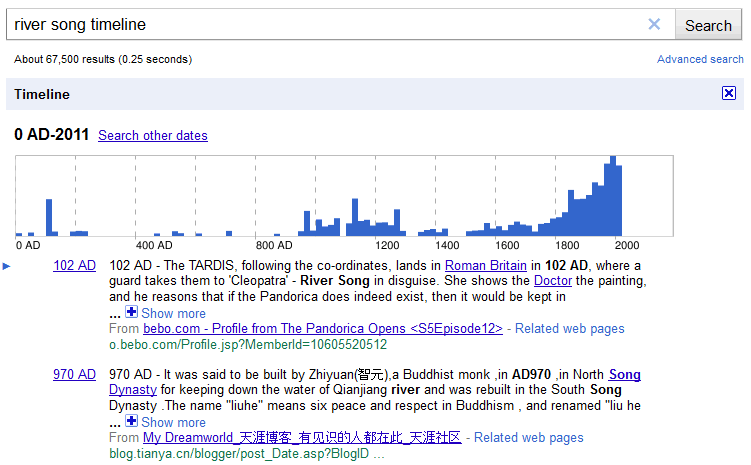
So I clicked, and this is what appeared:

Google Timeline view

Ooo! Pretty!

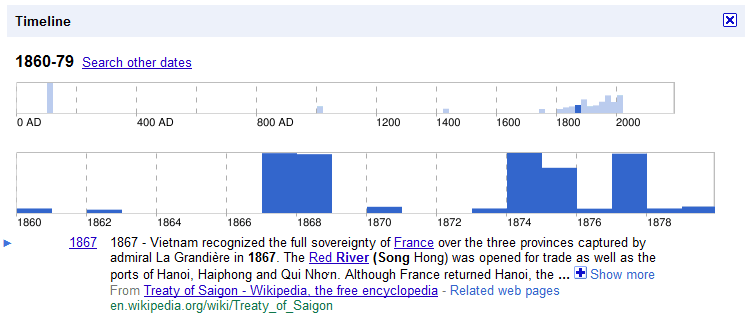
And it gets better. Click any segment in the main timeline to get a more detailed timeline for that period just below. Keep clicking there to drill down to finer and finer detail, or click another segment in the overall timeline to jump to another period. Every time you select a time segment, the search results below are filtered to reflect the period of interest.

Timeline Detail

In the case of my particular search, for a fictional time-travelling character, this tool turns out not to be all that useful, but if you’re searching for something more sensible (like timelines of genuine historic events or real people) there’s huge potential there. And for pure entertainment value it’s a whole lot of fun, and a great alternative way to represent data. Me likey. Go have a try.

Retuning a FreeSat Box

If you’ve gone down the FreeSat route, you may find from time to time that channels stop working. There are a couple of possibilities for why this happens:

  1. The channel has stopped transmitting.
  2. The channel has changed how it’s transmitting.

In the case of option 1, a bit of an auld google for the channel name should find you an official page somewhere, which may indicate whether they’ve gone from FTA (free-to-air) to paid, or a dead site may indicate that they’ve gone out of business.

In the case of option 2, instructing your decoder box to rescan should pick the channels up again. However, while a simple re-scan will usually work, under certain circumstances you’ll need to fiddle with the settings a bit first. Again, googling should point you to what’s changed so that you know which settings to modify.

Simple Re-Scan

If a channel has adjusted its frequency just a teeny bit, the existing program slot may magically start showing the channel again after a straightforward rescan; if they’ve made a big leap, the channel will most likely wind up tacked on to the end of your existing program list, and you’ll have to either start using the new channel number, or rejig your listings to move the new channel to where the old channel was, depending on how you use your decoder box.

Disclaimer: Every box I’ve ever used has just added new channels to the end of the existing program list when I re-scan. Just in case you have the one box that wipes the existing list and starts over, either decide you’re happy to do any channel re-ordering necessary before trying the steps below, or go find the manual that came with your box and see what it says before doing anything.

How to perform a simple rescan (generic instructions – check your box’s manual for specifics):

  1. Go into your box’s settings/menu.
  2. Find an Installation option and select it.
  3. Within Installation, select TP Scan/TP Setup or similar. (TP is short for transponder.)
  4. Select the Search option.
  5. Sit back and watch the progress bar till the re-scan is complete, then go check out your new channel list and see if you’ve got your channel back, either in its original location, or in the new channels at the end of the list.

More Complicated Re-Scan

If the channel has done something more interesting to change how it’s transmitting, you might have to play with some of the scan settings to get it back.

For example, BBC recently changed how it transmits its HD channels, changing from a DVB-S to DVB-S2 modulation. This meant that if you had already tuned these channels, you got a blank screen when you selected them, because the signal was no longer transmitted in the expected way. A simple re-scan uses a default set of parameters to find channels – if the channel you’re after uses non-standard parameters, it won’t show up. In our case, the default setting for our Ferguson Ariva Combo box was to search for DVB-S, but not DVB-S2, so the new BBC HD signals weren’t picked up. We had to explicitly instruct the scan option to use an alternative modulation.

Using our Ferguson Ariva box, this is what we had to do:

  1. Delete the existing channel entries for BBC HD and BBC One HD. (A simple re-scan with these still in situ didn’t work.)
  2. Select Menu | Installation | Satellite TP Setup.
  3. Select the following options:
    Satellite: Astra 2 EB1
    Transponder no: 10/87
    Frequency: 10847
    Symbol Rate: 23000
    Polarity: Vertical
    Transmission: DVB-S2
    FEC: Auto
    Modulation: QPSK
    Pilot: Off
  4. Select Search, and watch the HD channels magically reappear.

If you’ve recently lost your BBC HD channels and a simple re-scan doesn’t work for you, you should have similar options with whichever decoder box you’re using, so edit to the options above and try again.

If another channel goes AWOL from your listings, google to see if the channel still exists, and whether the broadcaster has issued a press release to say they’ve done anything interesting to how they transmit, then either do a simple re-scan, or a re-scan with modified settings as appropriate to get it back.

Happy World IPv6 Day!

June 8, 2011 has been designated World IPv6 day – a day when lots of the big players on the internet have committed to switch on and test IPv6 for a day to see how it goes. Hopefully, it’ll go swimmingly and no-one will be turning it off again later.

So what is IPv6, and why does it deserve its own day?

IPv6 stands for “Internet Protocol, version 6” and is the latest standard for assigning addresses to internet-capable devices.

Some History – IPv4

Before IPv6, machines on the internet were given addresses using IPv4. IPv4 addresses were 32 bits long, typically written as four decimal numbers, up to 3 digits long each, separated by decimal points. For example:

192.0.2.1

This gives ~4.3 billion unique IPv4 addresses to serve a current world population of ~6.9 billion. (I’m using US billions here.) Although back in the day when someone reckoned there was a world market for 5 computers this might’ve seemed excessive, now that many of us own a variety of internet-capable phones, computers/laptops, games consoles, even home electronics, and big businesses have farms of thousands of servers, it really doesn’t cut it any more.

ICANN (the Internet Corporation for Assigned Names and Numbers), who are responsible for managing internet address space, handed out the last of the IPv4 addresses to the 5 World RIRs (Regional Internet Registries) on February 3rd, 2011. Once these addresses are handed out, that’s it for IPv4 unless unused addresses can be reclaimed from their current owners – and would you willingly part with a resource that rare?

In practice, there are lots of tricks people use to allow machines to re-use a selection of IPv4 addresses, but reusing address prohibits these machines from communicating directly with each other – instead they usually hide behind and communicate through other machines that do have precious, unique addresses.

The Future – IPv6

So how about IPv6 addresses? These are 128 bits long, written as 8 hexadecimal numbers, up to 4 digits long each, and separated by colons. For example:

2001:0DB8:0000:0000:0202:B3FF:FE1E:8329

This gives a grand total of 3.4×1038 addresses, equating to significantly more than billions of trillions of addresses per person on the planet. Nice! Lots of scope there for an ever more internet-connected life for us all, if you’re into that kind of thing, and I am. 🙂

Want to Know More?

If you want to know more about IPv6 and its implementation, my hubby, David Malone, is co-author of this excellent O’Reilly volume, along with Niall Murphy (no relation): IPv6 Network Administration.

Search Tips #3: I’ll Tell You What I Want, What I Really, Really Want

Today, a couple quick tips on getting extra picky on what results you want your search engine to return. You can use plus and minus signs before search terms to instruct your search engine of choice to either weight results in favour of pages that include specific words/phrases, or to tell it to disregard pages that include certain words/phrases. This is particularly useful if you’re searching for terms that appear frequently in different contexts, as it lets you filter the results to better match the context you want.

The minus sign (-)

This lets you tell the search engine to specifically exclude search results with that particular word.

Say I’ve forgotten the significance of zig zag road markings, so google for the search term zig zag:
Google Search for Zig Zag

Lots of results on the erstwhile RTE celeb puppets and American child stars, but nothing on roads.

I’ll try filtering the puppets out and see if I do any better. This time, my search pattern is zig zag -rte.

Google Search Zig Zag Not RTE

Getting better, but still not there. Time to try something new.

The plus sign (+)

You can ask the search engine to weight results to favour ones that include one or more specific words by pre-fixing them with a plus sign (+).

I’ll try searching for zig zags again, but this time I’m specifically looking for the painted white lines, and my new search pattern is zig zag +white +line:
Google Search Zig Zag White Line

Bingo!

Now that my question is answered, I think I’ll hit Back a couple of times and indulge in some youth-recapturing with the guys from Zog. 🙂

Search Tips #2: Searching for Unknown Quantities

This is a Google-specific trick. If you have a piece of information in one frame of reference, but want to know it in another, you can ask Google if it knows the answer, and chances are it will.

To do this, enter the search pattern “X in Y”, where X is the piece of information you have (for example a weight), and Y is the unit or format you want the information in. For example, “4kg in oz”, “3m in feet”, or “2 pints in litres”. Very useful in this part of the world where mixed usage of metric and imperial units is common.

Google Converts Weight

Better yet, this trick also works for less obvious stuff like currency conversion.

Google Converting Currency

Google’s documentation of this feature is delightfully vague, so I’m only discovering what this feature can do by trial and error. If you figure out something particularly nifty it can convert, please comment below and share the wisdom.