Search Tips #1: Stop Words

Over the years, I’ve picked up a few search engine tips and tricks which I tend to take for granted until I chat to someone who doesn’t know about them, so I’m going to stick a few of them into blog posts to share. Maybe you’ll already know about them, maybe you won’t. Hopefully they’ll prove useful or entertaining anyway.

Tip Number One: Using Stop Words

Stop words are words that search engines usually disregard because they’re so common. They do, however, register where stop words occur in text patterns. This allows you to do some nifty things if you’re searching for something, but you’re slightly fuzzy on the precise details.
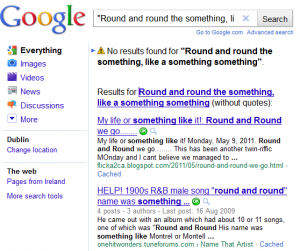
Googling for "Round and round the something"For example, say I’m trying to track down a certain children’s rhyme but I can only half remember it from my distant youth: “Round and round the something, like a something something.” If I enter that pattern into Google, it’ll look for that string of text with the word “something”, fail, and revert to searching for pages with frequent occurrences of the words in the query in any order. The phrase I’m looking for doesn’t show up in the first several pages of results, so I give up and try again.
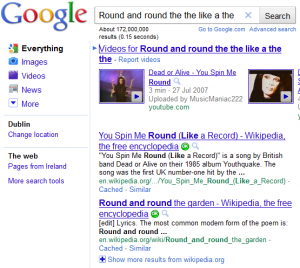
Googling Round and round the theThis time, instead of the “something”s I use a stop word (“the” is an easy one to remember), so my search pattern becomes “Round and round the the, like a the the”. Now Google ignores the actual word “the”, but acknowledges that I’m looking for a pattern with a word in that position, and the search results turn into:

Bingo! Result number 3 is the rhyme from my youth that I loved so well.

Wildcards
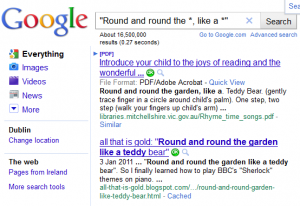
Round and round the wildcardIf you’re the type that’s into using wildcards, for this particular search the * character (representing “zero or more characters”) actually gets better results faster. However, the * character could match more than one word in the specified position, or even match no words. Either ways, searching with a stop word, or searching with a wildcard, can turn up different results, so it’s worth giving both methods a go if you’re hitting dead ends searching for what you’re after.

Get Running – A C25K App

I never heard of C25K till a few weeks ago when Roisin Ingle wrote a piece about keeping fit in the Irish Times magazine, but most people I’ve spoken to since seem to have either done it or intend doing it. C25K (Couch to 5 Kilometres), as the name suggests, is a program devised to take someone from a level of fitness that allows them to sit on a couch, to a level of fitness that allows them to jog/run 5k, all over a period of 9 weeks.

Get Running App LogoMs Ingle recommended an app called Get Running, and after a little musing I decided to take the plunge and give it a go. I’m sticking to the program religiously – not skipping ahead when I feel enthusiastic, and not taking a day off when I don’t feel like it. And so far it seems to be working.

The first run was hellish and I pretty much collapsed over the threshold when I got home, but by the end of week 1, I could manage my 8 one minute runs ok. Now I’m 2 sessions into week 3, and both times I’ve managed to twice run for 3 minutes solid without dying – three times the duration that nearly laid me flat in week 1. Huzzah! I’ve decided to trust the program and believe the thousands who have used it before me, so expect to be able to run for 30 minutes at a time by July, unbelievable and all though that might sound right now.

So – what about the app? I’ve not tried any of the other C25K apps, so this isn’t a comparison, it’s purely my opinion of this one.

  • Get Running is a paid app for iThings, but all the C25K apps seem to be. At just €1.59 it’s at the cheap end of the spectrum, though.
  • Get Running InterfaceThe cartoon-y interface shows a little winding road from a house with markers for each run in the 9 week period. You can select the section of path each run falls in to see details of what you can expect to be doing when you get to that stage.
  • Once you start the program, each marker along the path is flagged with either the date you did that session, or the forecast date you could be doing it if you stick to the program.
  • To start a run, you select the appropriate bit of path and click Run Week X at the bottom of the screen. The coach prompts you to start off with a 5 min walk to warm up, then lets you know when to start and stop running/walking till you’re done running, have done a 5 min walk to cool down, and are ready to start stretching. If you’ve selected it in the preferences, she’ll also give encouraging prompts of how far through the particular run/walk and complete session you are. “Just 10 seconds more! Keep going!”
  • Get Running - SettingsYou can repeat a week or skip ahead by selecting the required portion of the path, which allows you to repeat sessions if you’re not progressing, or to skip ahead if the starting level is too easy.
  • You can listen to your iPod as you go, and ask the app to either fade what you’re listening to out and back in again when it’s time for a prompt (good for podcasts and audiobooks), or just lower the volume and talk over what you’re listening to.
  • The coach is a chirpy Australian sounding lass. I was amused that in week 1 she kept saying “you will run …”, “you’ve just run …” etc., but once the feeble introductory one minute runs were over, from week 2 she started saying “we’re going to run …”, “we’ve just run …” etc. I wonder if that was deliberate during scripting? Will listen out for similar language changes in the coming weeks.
  • One feature I really hoped for before downloading and was delighted to find the developers had included was a midpoint alert – “we’ve reached the halfway point – turn back now if you need to”.

Supplementary Apps

Two free apps I’m using in conjunction with Get Running are:

  • Stretch&Run – Video tutorials of exercises and stretches to compliment running.
  • RunKeeper – Available on platforms other than iThings, RunKeeper uses GPS to track your path, overall distance and speed (both in 1 minute intervals and averaged over the duration). Slightly worryingly, it tells me that my pace is 596523 minutes/kilometer for certain minutes – I’m presuming it actually lost GPS contact in those minutes and couldn’t tell how I was doing. I don’t think I can really have been quite that slow, though I’ll readily admit I’m not fast!

In Conclusion

I’ve never particularly enjoyed running before, but with the C25K program I’m starting to get it, and I can see that I’m making real progress each time I go out, which is encouraging me to keep going. Without the app, I’m not sure I’d be doing as well – I suspect I’d be stopping to look at my watch too often instead of keeping up the pace. If you’re considering trying C25K, this app is easily worth the €1.59 – spend another few bob on decent runners and get going!

No Such Thing as a Free Meal – Free TV on the Other Hand…

When we moved to our current home a few years ago, we decided that rather than endure the hassle and expense of a subscription-based service for our TV needs, we’d look into setting up a system to receive TV for free. (Aside from the TV license which we loyally cough up for every year!)

We started off with a Free-to-Air kit from Lidl for the UK channels and rabbit ears for the Irish, but over the years we’ve fine tuned and tweaked our system to suit our needs.

An annual subscription to one of the main TV packages in Ireland will cost you €276 for a one-TV setup. You can set up your own “free” system using the components described below for a similar cost, plus a weekend of DIY and geeking that will either make or break your relationship with the people you live with, but once it’s in place there’s no ongoing fee.

Equipment

  • Satellite dish – These are available all over the place. They show up regularly in Aldi and Lidl (usually including a satellite decoder box), or can be purchased in most big hardware stores, like B&Q. If you’re already signed up to one of the big satellite companies, chances are your contract says that once you’re out of your minimum term you get to keep your dish. For the typical channels of interest to an Irish audience, you’ll want to point at the Astra 2 satellite at 28.2° East. If you fancy an alternative selection of channels, check the lists on lyngsat.com to see which satellite broadcasts the ones you’re after.
    Cost: Free -~€80.
  • LNB – The LNB is the little box that sits at the end of the satellite dish’s arm reading the signal collected by the dish. You’ll usually get one of these with your dish, but double check in case you need to buy one separately. Because the LNB is an active element of the circuit, you’ll need a connection on it for each TV you want to connect to the dish: don’t try using splitters on your cables, it won’t work. Each decoder box in your house needs its own LNB connection, and the box sends an instruction to the LNB saying which channel it wants separated out from the hundreds picked up by the dish.
    Cost: A bit over a tenner for a single LNB, up to ~€40 for a quad/octo LNB.
  • Terrestrial antenna – The Saorview Irish channels aren’t currently broadcast via satellite, so you’ll need a terrestrial antenna to pick these up. Look for DVB-T written on the box. Depending on how close you are to a transmitter (see map), you could get away with anything from a booster with rabbit ears beside your TV, to a big spikey antenna in your attic or on your roof.
    Cost: €20 to crazy money.
  • Coax cable and F connectors – You’ll need coax to hook your satellite dish and/or terrestrial antenna to your decoder box(es), with F connectors at each end. How much cable you need is highly dependent on where your dish/antenna is located and how many decoder boxes you’re using. Dish kits often include a reasonable length for free.
    Cost: 100m spools of coax go for ~€30-60. Connectors are less than a euro each.
  • Decoder box – You can go for separate boxes for the satellite signal and the terrestrial signal, or a fancier box that will do both. We went with the latter – cuts down on hardware, and power and TV connections. Our box is a Ferguson Ariva HD Combo, which in addition to decoding both satellite and terrestrial signals also has a USB connector so you can hook up an external hard drive and use PVR functions (pause/rewind live TV, and record programs to hard disk).
    Cost: ~€180-200 for the new edition of the Ferguson Ariva box.
  • TV – I’m not factoring this into the overall kit cost, but make sure you have something to watch programs on once everything else is in place (a TV, projector or computer), check what connectors you have (Scart/AV/HDMI/…) and make sure they’re compatible with the decoder box you want to use. Dave picked our TV so it has silly numbers of connectors of every flavour, just in case – once a sys admin, always a sys admin.

If you’re looking for places to start locating all these bits and pieces, places we’ve used for ourselves and friends/family we’ve helped get their own set ups going are: Aldi and Lidl (seasonal availability), freesat.ie in Fairview (helpful, friendly guys), B&Q, Maplins and Peats. And ask around for spare parts – anyone who’s started out with a kit system may well have dishes, cable or decoder boxes lying around gathering dust – we’ve rehomed a fair amount of kit as we went through the fine-tuning process.

Finally, once you’re all set up, if you’re in search of a nice, customisable TV listing tool to go with your custom installation, check out the TV Guide app/web site.

2Do App Review

2Do is one of my favourite and most-used apps. It’s not cheap, at €5.49, but for me it’s worth every penny.

Features-wise, there are way too many to list in a brief review like this one. This app has just about every bell and whistle you could wish for when it comes to to do lists and I haven’t even used the vast majority of them, but I feel secure in knowing that they’re there waiting for me when I need them. (On a side note, I approve highly of the tech writing on their tips webpage – it covers a great many of the options and possibilities very neatly.)

A few of my favourite features:

  • Multiple calendars – Really, this is a necessity, but not all To Do apps have it, so it’s worth mentioning. Categorising your tasks using multiple calendars allows you, for example, to separate work tasks and home/family tasks. As a self-employed bod, I break down work tasks in separate calendars according to client/project. Once you have your tasks all neatly categorised, you can then look at your to dos for any individual calendar, all to dos for the current date (includes overdue tasks not completed on earlier dates), or to dos from all calendars filtered according to other criteria (for example, high priority, in a specific timeframe, or tasks with no due date).
  • Soundex searching – I don’t actually use this much, but it is quite nifty. If you can’t remember how something is spelled (client/product names, for example), you can search for it by typing in something that approximates what you’re after, and 2Do will locate the appropriate task(s). (For example “huver” will find tasks that include the term “hoover”).
  • Multiple sync options – One of the nicest things about this app is that you can sync it with several standard systems, so if you want to stop using it, or change to a new app, your data isn’t tied up irretrievably in a proprietary format. I sync every other day with ToodleDo, and at random intervals with Outlook. If you have a MobileMe account, you can sync with that too.
  • Different task types – You can add a vanilla “to do” item, a project with a number of sub-items (in which case you can tick off each sub-item individually, or mark the project as a whole as completed), or a check list (for example a grocery list). The options you can set for each task type changes depending on which of the 3 types you select.
  • Recurrence options – I love that you can specify whether recurring tasks should occur at an absolute interval (a specific day of each month), recur at a specific interval (every 10 days), or recur a certain time after it was last completed (water the houseplants 2 weeks after you last did).
  • Defer tasks – Tap and hold any task and you get a little popup of options, select Defer here and you get a second popup which allows you to “defer” tasks to today, tomorrow, the day after, the day after that, or no date. I’d prefer if the “day after that” option was “a specific other date”, but this feature is fierce handy for quickly redistributing things when you wind up with to do build up on any given day.
  • Sharing tasks – Again, not a feature I use much, but I can see great value in it. Tap and hold popup any task, select Share, and you’re prompted to Tweet, Mail or SMS details of the selected task. Particularly handy to pass on details of checklists or projects without going to the hassle of re-entering all the details.
  • Viewing “Done” tasks – You can define a period after which completed tasks should be deleted in the settings, if you’re so inclined. I like to hang on to mine, as my memory is crap, so that at the end of the day/week I can review and see what exactly I’ve been up to. It’s reassuring to see a nice, busy list instead of a blank screen.
  • Nearby – I don’t actually use this feature because I leave location services turned off to save battery, but it sounds quite neat. You can assign a location to your tasks, then ask the app to tell you what tasks you can do in or around your current location. I’ve landed home from a trip out shopping more than once to realise I should’ve done one more thing while I was in town, and this featue could be my salvation in cases like this.

If you’re using this or another To Do app and have favourite features not mentioned above, please give them a mention in the comments.

Now, I’m off to mark “Blog post” as done, then move on to the next task. 😉

Bis bald!

Rolling Back a Bad iThing App Update

Yesterday I updated an app on my iPhone and found one of the changes annoying enough that it prompted me to figure out how to roll back an app update for the first time in my long history of iThings and apps (Facebook, I hope you feel proud). If you find yourself in a similar position, the procedures below should help.

Note: I use iTunes on Windows – Google suggests that Time Machine can help resolve the same problem on a Mac, but I’ve not tested.

If you updated your app on your iThing

  1. Delete the unwanted version of the app from your iThing.
    Note: If there’s data associated with the app, you’ll lose anything you’ve added since your last sync with iTunes.
  2. Sync with iTunes.
    The last version of the app downloaded/sync-ed with iTunes is reinstalled on your iThing. Hooray!

If you updated your app in iTunes on Windows

  1. Delete the unwanted version of the app from your iThing.
    Note: If there’s data associated with the app, you’ll lose anything you’ve added since your last sync with iTunes.
  2. Delete the unwanted version of the app in iTunes in the Apps section of your Library.
  3. Go to your Recycle Bin in Windows.
    iTunes moved the old app here when it downloaded the new version.
  4. Locate the .ipa file for the app you want to roll back, right-click the file and select Restore.
  5. Go to <Drive Letter>:\Users\<User Name>\Music\iTunes\Mobile Applications, locate the restored .ipa file, and drag it into iTunes.
  6. Sync iTunes with your device, and voila, the older version of the app is back.