Disappearing text in PDFs – Part 1

There’s little more frustrating than finishing writing a lengthy document, with minutes to go to a deadline, clicking Save as PDF with a heavy sigh of relief that everything’s finally done, then opening the final PDF for a last once-over before drawing a line under the project, only to discover that – GAH! – a bunch of text is missing! But it was there the last 20 times you generated draft PDFs! What’s happened?

I’ve had text disappear from PDFs mysteriously twice in the last year, both with different causes and solutions, and I had a heck of a time trying to find a solution both times. This post is on the most recent, and more obscure, problem.

I was working on a FrameMaker document that contained a series of tables of data. All had gone swimmingly through several iterations of the draft document, but when I generated the final PDF for publication, the text from the first cell had disappeared in 80% of the tables. Odd.

I saved again with the same result. Still missing. I rebooted my machine and tried again, still missing. Updated my software, still missing. I checked the help but couldn’t find a description of my problem. Not even google could help me out. This was getting annoying.

I went back to the dud PDF and discovered that if I tried to select the missing text in the affected cells, I could copy and paste it from the PDF to a text file, so it was actually there, just invisible.

So, probably a font issue? I modified the text properties to use a different font, different size, different colour. Nada. I edited the PDF settings in Acrobat Distiller to embed all fonts all the time, never substitute fonts, increase the resolution, decrease the resolution… You name it, I tried it, but the cell contents remained obstinately invisible.

Back in the source files, I tried recreating tables and changing font settings, but nothing worked.

Finally, I gave up my investigations, grabbed a cuppa and vented at a colleague. He described a similar problem he’d had when working in PowerPoint. In that instance,  a background had rendered in front of the content on saving to PDF, so to fix the problem he selected the background and sent it to back in the source file. Food for thought.

I decided to check out the table properties in FrameMaker, and there it was: row backgrounds were set to white. But the page was already white, so I could safely remove that. I set the background to None instead for the affected tables, saved as PDF one more time, and my invisible content reappeared. Huzzah!

Still no idea why the problem affected first content cells only, or only a random subset of the tables in the document, but if I ever encounter disappearing content in table cells again, I’ll be checking out my cell background properties first.

A completely different cause of and solution to text disappearing when FrameMaker files were saved as PDFs is covered here.

Dealing with Rogue Fonts in FrameMaker

This is a FrameMaker gotcha that occurs frequently. You’ve used a font somewhere in a .fm file, moved the file to another machine, and got an error saying the font’s not available and will be substituted by something else. Sometimes this is a nuisance, sometimes it’s a really big deal.

Temporary Substitution and Permanent Substitution

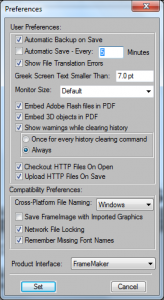
FrameMaker 9 General Preferences Dialog BoxFirst things first. Check whether any substitution FrameMaker makes will be permanent or temporary before you do anything with the file. Depending on your settings, once you hit Save, the substitution could be made permanent, and if you don’t have another template to import from, or if the font usage is a manual style override, then you’ve lost the correct style information forever. What’s more, you get no say in which font FrameMaker uses instead, so you might just be creating a new, different problem if you allow a permanent auto-substitution.

To check how FrameMaker is handling missing fonts, select File | Preferences | General…, and in the dialog that appears see whether the check box beside Remember Missing Font Names is selected or not.

If it’s selected, FrameMaker will substitute another font while you’re editing on the current machine, but if you move to a machine with the original font installed, it’ll start using that one again. If the check box isn’t selected, then FrameMaker substitutes another font for the one that’s missing, and when you save, the substitution becomes permanent.

If you want to change the Remember Missing Font Names behaviour, close any open files first (without saving), then:

  • If you are 100% sure that the font should never appear here under any circumstances, de-select the box. Open your file, FrameMaker will substitute a font you do have; save your file, and the rogue font is gone forever, but you’re stuck with whichever substitution FrameMaker went for.
  • If you want all the original font information for the file to be remembered, select the check box, and work away, secure in the knowledge that things will look as they should again when you move to a machine with the correct fonts.
  • If you don’t particularly care eitherways, select the check box anyway – if it’s a shared document someone else might care.

Where’s the Font?

If you want to track down where a missing font is used, FrameMaker’s Find/Change function will help you do so.

  1. Open the Find/Change dialog box/tab/panel/whatever you’re having yourself.
  2. Select Character Format from the Find drop-down list.
  3. Select the font you were warned about in the Family drop-down list at the top of the ensuing dialog box.
    To make things easy, unavailable fonts appear greyed out in the Family drop-down list, so you can identify them at a glance. Hooray.
  4. Next, repeat steps 1-3 on Body pages, Master pages and Reference pages separately. Find/change operations only apply to the page type you’re currently on. Le sigh.

If you find the font, you can make a call on whether the usage is valid or not. If it’s not, get rid of it; if it is, keep it. Simples.

Sometimes, though, you won’t find the font on Body, Master or Reference pages. In this case, it’s truly rogue, and the best way to proceed, provided it’s either the only font that you’ve been warned about or you’ve had the same result for all missing fonts reported, is to de-select the Remember Missing Font Names check box and save the file. FrameMaker will eradicate it from the file forever and you can live happily ever after.

Back in Kansas

If you preserved original font information while you edited, then you should either install the missing font on your current machine, or move to a machine with the font installed before you publish.

If you didn’t preserve original font information, you should re-import your paragraph and character formats from a copy of your template before publishing. (And make sure you’re on a machine with the required fonts.)

Aside – Missing Fonts Hinder Global Find/Change

If you’re performing a global find/change across a book, and some files in the book use missing fonts, FrameMaker refuses to open them to search through. The simple work around here is to open all files in the book before starting your search.

BookVars FrameMaker Plugin

One of the single sourcing features I’ve used most in FrameMaker is variables. These are nifty little placeholders you can stick into your documents to say “put the product name here”, “put the company name here” and the like, then when it comes time to publish a book, you can set the required values.

Variables save an innordinate amount of time when it comes to rebranding common material used across a large documentation set. Consider a couple of typical scenarios based on real life experiences:

  • One company releases multiple versions of a product under different names with 60-90% common functionality in each of them, but the main product name and a few of the component names change for each version.
  • Another company announces the night before a release that they’ve decided to change the product name. Unfortunately, the product name includes the company name, so a straight search and replace isn’t good enough – each and every one of 1000+ occurrences of the name must be checked before making any edits.

In either of these scenarios, but especially the second, variables are your friend.

Once upon a time, I managed variable settings for different releases by having a single FrameMaker file for each release, with the appropriate permutation of variable definitions in each file. This is a reasonable strategy, and works well for small doc sets.

When doc sets start to get bigger and more complex, it’s a less manageable solution. For example, say your company rebrands and changes its name. If you’re using a variable for company name, and have 30 FM files with custom sets of variable definitions for 30 possible release scenarios, you have to make that substitution in 30 locations.

That’s when Leximation’s BookVars plugin becomes a very attractive option.

I discovered this plugin last year when I worked with a company who were already using it. At the time they had one BookVars config file per book, which is largely equivalent to what I’d been doing with the custom FM files before, but while I was there we fine tuned variable usage across the doc set and set up a single common BookVars config file for all release scenarios.

A BookVars config file contains one or more named Groups of variable definitions. When you’re ready to publish your book, you select to import the variable definitions for one Group across all files in the book, and away you go. Better still, any Group can reference any number of other Groups in the same config file, which means you can, for example, have:

  • A Universal variables Group (company name, current year, etc.).
  • Product-specific Groups (product names, names of components within the product, etc.).
  • Release-specific variables (publication date, version number, etc.).

There’s an enormous amount of potential there to cater for all manner of scenarios.

The other key features we got some value from when creating our common BookVars config file were:

  • Deleting unused variables across the current book. This allowed us to weed out all the legacy variables no longer in use before standardising usage across the doc set, and to get rid of leftovers at the end once we’d renamed and/or substituted several others.
  • Renaming and replacing variables. This allowed us to deal efficiently with duplication, a common issue in larger doc teams.
  • Deleting infrequently used variables. This allowed us to convert a few variables that were used only once or twice across several thousand pages back to text to be edited manually in the guides in future.

BookVars is ideally suited to projects where you spend an hour or two setting up and double checking variable usage for each release. Depending on the complexity of your doc set, it could take anything from a few minutes to several days to analyse your variable usage and distill out one or more useful config files, but the payoff, if you get it right, is a 2 minute setup time the next time you publish, which can be a very worthwhile result.

ETA: I forgot to mention pricing. BookVars is free to try, $35 for an individual license, or $525 for a site license covering 25 users. If you’re dealing with a doc set complex enough to warrant using the tool, it’ll pay for itself very quickly at those prices.

Re-creating a Book in FrameMaker

I’m a massive advocate of FrameMaker. It’s a great documentation tool, and unlike a certain other product, it doesn’t try to read your mind and make all kinds of weird and wonderful unrequested changes under the hood without checking with you first. Or that’s mostly the case, at any rate.

I have had problems with one instance of FM storing meta data without letting me know it was doing so, or giving me an easy way to remove it: when you update a book file, FM catalogs and hangs on to some meta data about its contents that you might rather it forgot at some point and there’s no obvious way to make that happen. The data type I’m aware of (there may be others I’ve not encountered) is condition tags.

Here’s the story: I worked on a doc set that was maintained by multiple authors. One particular chapter of information was repeated in 3 guides, and 3 versions of the content were being maintained separately, so we decided to merge the chapters and reference a single file from all 3 book files. Huzzah for efficiency!

When we started the merge, though, we discovered that the 3 chapters used different condition tags that all did the same thing. This hadn’t been an issue before as each book was maintained in isolation, so once conditions were the same across all files in the book, that was fine. Once you started using content from one book in another, though, things started to get messy.

In anticipation of merging/reusing further content, we decided to spend some time standardising the condition settings across the full doc set. We agreed a common naming and formatting scheme for the conditions and updated all content files to use the new conditions. Job done.

Well – no. When it came to updating the books, the Show/Hide Conditions dialog now showed all the old condition names plus all the new condition names, and there was a bit of confusion over why they were all still appearing. Had we missed a reassignment/deletion somewhere? We couldn’t find it on Body pages, so started trawling Reference pages and Master pages to no avail. If we were going to be stuck with all the conditions being listed, how would we remember which ones were current so that our Show/Hide conditions were guaranteed to be correct?

After a bit of googling and experimenting, I discovered that FM book files retain meta data about the conditions used by the files within the book, and the only reliable way to get rid of the data was to re-generate the book. Great.

I tried:

  1. Create new book.
  2. Drag files from old book.
  3. Save new book.
  4. Check Show/Hide settings (unwanted conditions gone – yippee!)
  5. Regenerate book.

Uh oh – the generated TOC from the original book was now static in the new book.

OK – so I’d just recreate the TOC and all would be fine. But TOC setup information, titles, headers and footers, custom page layouts and the like were lost, and making sure everything was set up correctly again would mean spending more time than I fancied verifying every detail against the style guide and templates.

I was starting to wish we’d never started making things easier.

Surely there was a sneaky way I could just convince the new book file to use the old generated file again?

So, to cut a longer than necessary story short, after some trial and error, I came up with the following:

  1. Back up your project just in case – this should be your first step in any significant book-level operation.
  2. Click File | New | Book to create a new blank book.
  3. Open the old book and drag all files (static and generated) from the old book to the new book.
  4. Close the old book without saving (just in case).
  5. Save the new book. You can replace the old book if you like.
  6. At the book level, click Add | Table of Contents.
  7. Click Add on the Set up Table of Contents dialog – don’t worry about selecting paragraph tags to include yet.
  8. Click Update on the Update Book dialog.
  9. Close the generated TOC file without saving.
  10. Copy the name of the old TOC (now a static file in the new book), delete the static file from the book (but not the disk), and rename the generated TOC file to the old TOC file.
    If you don’t remove the static file from the book before renaming the new one, FM won’t let you reuse the file name.
  11. Right-click the TOC file and click Set up Table of Contents.
    The Set up Table of Contents dialog shows all paragraph tags in the guide on the right hand side. There’s a <paragraph tag>TOC paragraph tag for all paragraph types that were included in the original TOC, so scan through the list and add the non-TOC version of each of these tags.
  12. Click Set on the Set up Table of Contents dialog.
  13. Update the book.

Ta dah! New book, superfluous meta data gone, lovingly fine-tuned TOC file preserved, in a fraction of the time it might’ve taken.