Checking Readability in Word

My 5 year old’s school is running a program to help the small folks with learning to read and write. As part of this, the small folks’ parents get weekly meetings with a support teacher to discuss tasks and learning objectives, and the techniques that will help us and the kids to achieve them. It’s relatively painless, very interesting, and I can see a huge improvement in my small person’s reading skills after just 2 weeks, so all good.

At yesterday’s meeting, the issue of reading ages for different texts came up, which reminded me of a hidden tool in Word that can check the readability of your text.
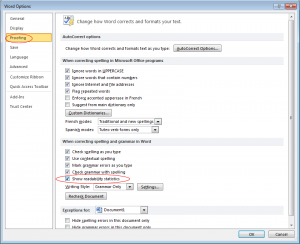
The Word Options Dialog BoxTo turn on readability checking in Word 2010:

  1. Click File | Options.
    The Word Options dialog appears.
  2. Click Proofing.
  3. Under When correcting spelling and grammar in Word, select Check grammar with spelling.
  4. Select Show readability statistics.
  5. Click OK.

(If you’re using another version of Word, search for “readability” in the Online Help to get instructions on how to turn this feature on.)

Once readability stats are enabled, just run a spelling and grammar check on your documents as usual, and when that’s finished, Word pops up a dialog showing lots of lovely stats on your text.
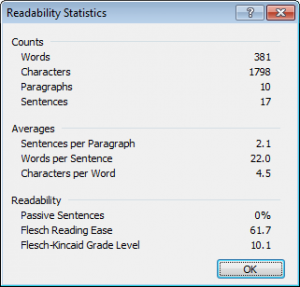
Readability Statistics ResultsI’ve illustrated with the results of an analysis on my last blog post (Online Baby-Related Resources) .

For the Flesch Reading Ease, the  higher the score, the easier your text is to understand. At the top of the scale, 90-100 should be understood by an 11 year old. A score of 0-30 means that your readers will most likely need a university degree to understand what you’ve written. My article scored 61.7, meaning it should be easily understood by 15-17 year olds. Given the subject matter, that seems like an acceptable lower boundary.

The Flesch-Kincaid Grade Level equates the Flesch Reading Ease score to an American school grade (10.1 for my piece).

If you’re aiming for a particular reading age, you can go back and tweak your writing as appropriate to achieve an appropriate Readability score. The Counts and Averages stats will give you an idea what to focus on. To get a lower score and increase your audience scope, use simpler vocabulary, and rewrite for shorter sentence length. Keep editing and rechecking till you’ve reached the reading level of your target audience.

For more information on how the Flesch Reading Ease and Flesch-Kincaid Grade Level scores are calculated, and what the results mean, check out this Wikipedia page.

Online Baby-Related Resources

Seems to be a baby boom going on at the mo, so for all my pregnant pals, I’m going to do a roundup of some online resources for expectant/new mommies that I found useful when expecting my two.

First off, websites:

  • Magic Mum – Subscription required. Loads of different forums on all stages of parenthood (trying to conceive, pregnant, struggling through those first few weeks, dealing with toddlers or teens…), to buy/sell/giveaway areas for baby- and non-baby-related gear, and to chat about non-baby topics such as house and home, hobbies, weight-loss… You name it, there’s a forum for it here. It’s a very active site, and I found it a really fantastic resource on my first pregnancy and first year with a baby, though I’ve drifted away from it a bit now that I’ve found my feet.
  • Rollercoaster – This site has lots of useful articles on conception, pregnancy, family life, nutrition, links to baby-related retailers, product reviews and the like. A good place to start if you just want to read some straightforward info without getting into debates. They’ve also got forums, and you can join a group for mums due the same month as you so you’re in touch with people at exactly the same stage all the way through your pregnancy.
  • Mumsnet – A UK site with more forums, blogs, info pages. Since things work slightly differently in the UK, not all of the info will be relevant to the Irish experience, but I particularly like their Product Reviews page, so wanted to give them a mention.
  • Name voyager – Stick in a name and see its popularity plotted over time. This is fun whether you’re expecting or not – try it with your own name.
  • Pampers – Info pages and Q&A for different stages of pregnancy and development in early childhood. As it’s a commercial site, they also have brand and product promotion, so you can sign up for a free pregnancy calendar, regular info packs, samples and money-off vouchers. One of my favourite freebies from these guys was a CD that arrived early in one of my pregnancies with the sounds of “inside the womb.”

If you have a favourite site I’ve not mentioned here, please give a mention in the comments!

Next time, podcasts.

Foozle

Foozle iconFor a bit of Friday Frivolity, I thought I’d share a current favourite iThing app of mine and my 5 year old’s: Foozle! Great name, great game. It’s less challenging (and frustrating) than Angry Birds, which is good for the 5 year old in particular, but it’s still quite engaging.

The basic premise is that you have a bunch of furry little shape-shifting critters, some of whom are good and some of whom are bad (and occasionally some of whom are neutral) sitting around on platforms. Some platforms are level, some are angled, some are bouncy, some swing… You want to make all the bad guys fall off the screen, while hanging on to the good guys. Tapping a Foozle changes its shape from a square to a circle, and depending on where it is, that’ll either start or stop it rolling. The fewer times you tap to get rid of the bad guys, the higher your score.

Sample Foozle Level


ABBYY TextGrabber + Translator

The TextGrabber + Translator – ABBYY app is the biz, and incredibly easy to use.

Launch the app, point your iPhone at a piece of text, give it a moment to autofocus, snap, crop to just what you want, then click Read. Moments later, you’ve got an editable copy of the text in front of you to do with as you will. Alternatively, you can select a photo from your Camera Roll if you’ve already got a snap of the text you want analysed.

First thing you should do is check for any characters the app got wrong. There’ll probably be a couple, but not many. In my experience, kerning in the original text or glare off the page are the most likely causes for error. You can edit the text in situ to fix any problems, then choose from a variety of built in options as to what to do with it:

  • You can tweet the text, or post it to Facebook.
  • You can stick it in an email or SMS.
  • You can search for it using Google.
  • You can copy it to Evernote.
  • You can just copy it to paste into any other app you want to use.
  • And a particularly nice touch: you can select to translate from the source language to another (powered by Google Translate).

Or you can do nothing for now. The OCR-ed text will stay in the app’s history, and a snap of the original image in your Camera Roll, until you’re ready to come back to them.

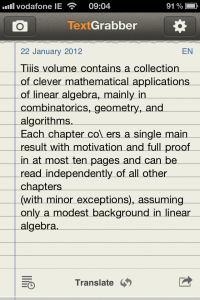
Here’s an example of how it performed on the blurb from the back of a text book we had lying around:

Original Scan of Book Blurb
Original Photo of Book Blurb

ABBYY TextGrabber Result

I cropped to the first paragraph only, and it got just two characters wrong. Not bad.

I can see a multitude of uses for this app – from quickly grabbing contact details from advertisements before calling/mailing, to translating menus when travelling, or instant note taking in libraries.

Presentation Tips & Tricks – Part 1 – Speeding Up and Slowing Down

I’d like to share a few useful tips and tricks for working with PowerPoint that I’ve come across over the years, starting off in this article with a few tips on how to work with automatic timings, and to break from those timings when things go off track.

I’ve tested all of these procedures with PowerPoint 2010 while writing – your mileage may vary with other versions.

Timing Things Just Right

Imagine you’ve been given 5 minutes to give a presentation with 20 slides (yes, this really happens – check out Ignite Dublin for some excellent examples).

Left to manually change slides you might panic and move too fast, or get too engrossed in your story and have to stop before you’re halfway through. You could keep an eye on the clock, distracting you from what you’re saying; or ask an audience member to prompt you at intervals, distracting them.

A more elegant solution is to apply automatic timings to your slides. In the case of Ignite, I believe each slide gets equal time, so the solution is simple (15 seconds per slide), but in another forum, you might want to give twice as long to one slide as another, or run 5 slides in rapid succession, spending the rest of the time focusing on the remainder.

PowerPoint allows you to rehearse delivering your presentation and time how long you spend on each slide. It can then replicate the flow for you when you’re delivering for real. It’ll also let you know your overall presentation time, so if you need to bump it out a bit or reign it in, you can decide which slide timings to tweak. And you can edit the per-slide timings manually – you don’t need to rehearse and record a second time unless you really want to.

To rehearse and record your timings:

  1. Rehearse Timings buttonGo to the Slide Show ribbon and click Rehearse Timings. PowerPoint will start the presentation from slide 1.
  2. Go through your presentation at your intended pace, hitting the space bar every time you want to progress to the next slide.
    When you’re done PowerPoint will tell you the total time taken for the presentation, and ask if you want to record your slide timings.
  3. Click Yes to save the recorded timings, or No to discard them.

To edit slide timings:

  1. Advance Slide fieldSelect the slide whose timings you want to edit.
  2. Go to the Transitions ribbon, and find the Advance Slide section.
  3. Edit the value in the After box (minutes:seconds) to how long you want this slide to stay on screen.

Note: In the Advance Slide section, you can uncheck the box beside After if you want to stay on the current slide for an indefinite amount of time, for example where audience participation is required and you don’t know how long will be required. In this case, the presentation will move forward automatically on the other slides, but wait for you to manually move on from this one.

If you want to turn off automatic transitions for all slides, go to the Slide Show ribbon and de-select the Use Timings check box.

Taking a Break

Sometimes you’ll want to depart from your presentation due to a pertinent question, an impromptu debate, or an interesting tangent. If the content in the current slide is relevant to your break, you can pause your presentation by right-clicking and selecting Pause.

If it’s not, you can quickly blank the screen by either tapping B on your keyboard to show a Black screen, or W to show a White screen. Clicking B, W or the space bar will return you to your presentation, and timings will resume from where they left off. For example, if you clicked B 5 seconds into a 15 second slide, it will stay up for a further 10 seconds when you resume.

Jumping Ahead

If you want to skip ahead in your presentation, you can simply click your mouse, hit the space bar, or use the forward or down arrow keys. All do the same thing and move you forward one slide at a time.

If you jump ahead, any timing set for the slide you move to remains the same – if it was due to stay up for 5 minutes originally, it will stay up for 5 minutes from the time you open it, even if you get there 10 minutes early.

Jumping Back

To move backwards in a presentation, one slide at a time, use the back or up arrow keys.

When you jump back to a particular slide, PowerPoint will stick with that slide till you’re ready to move on, regardless of any timing settings. Once you move forward again to any subsequent slide, the recorded timings from that point on apply as usual.